Saturday, November 10, 2012

Gone Fishing

My sister-in-law's step father asked if I would do his retirement cake. He said he wanted it to look like the party invitation. When I got the picture, I almost said no, but then I decided I would take the challenge.

Even though he was "retiring," he had a boat and he decided to spend all of his time taking clients out fishing. Sounds pretty rough for someone who absolutely loves fishing. It's funny that people retire and then manage to simply find a different job.

I took the picture, inverted it, and blew it up to 11 x 17 size. That way, I could do a buttercream transfer of the entire top of the cake. It would be far easier than trying to do it freestyle. I had also been wanting to try doing an entire cake's surface as a transfer since I figured it would provide additional stability to the image. If you try to do an image with a lot of detail without surrounding support for it, the details are likely to break off when you try to remove if from the plastic. I figured that one giant sheet of frozen icing would be pretty solid and easy to manipulate.

I had a pretty large bamboo cutting board that I taped the image to the back of. I carefully covered it with plastic wrap so there were no wrinkles at all. I then set about mixing the many colors I needed one by one and slowly built the image up from light to dark. Once I had the main image complete and all of the background details, I filled in the background water and sky. I then stuck the whole image in the freezer for a couple of hours. I was working on the previous Mario cake just before finishing this one, so it was another really busy day.

I took the image out of the freezer after it seemed to set up and readied to put it on the cake. The cake was covered with white buttercream and I tried to make sure it was still wet when I flipped the image from the cutting board over on the cake. This is a tense moment, because the image warms quickly after you take it out of the freezer and if it warms too much, there is absolutely no chance you will get a second attempt before it softens. You have to work quickly.

0818121840, Uploaded from the Photobucket Android App

I managed to get the image almost perfectly centered on the cake and shaved off a little bit of the image that hung over the sides. I then piped around the top to cover the edges and the small gap between the icing image layer and the icing below it. I was piping the border just before walking out of the house. It was also a very humid rainy day, so the icing took a while to set up. Travelling without letting the icing crust completely is a dangerous proposition. I pushed it a little too much and the top border icing did shift a little bit. Nobody commented on it and I may have been the only person who really cared, but it bothered me. I actually like this type of image better than some airbrushed or printed image. It seems much more impressive when it's all made from icing, especially when it is a detailed image like this one.

Mario 1up

What better for a birthday than a 1up mushroom from Super Mario. This is another swim party cake, but for once the parent asked for a theme. Mario is certainly a theme I can work with. I got inspired by this one and did something way more elaborate than I would normally do for one of these.

0818121300, Uploaded from the Photobucket Android App

The base of the cake was a two layer 10" cake. It was covered with blue buttercream to make the sky background, then partially covered with fondant to represent the clouds. I made the castle from the game and the little shrubs with eyes that are so cool in the backgrounds. The castle has the child's age on it as a nice little touch.

0818121301b, Uploaded from the Photobucket Android App

The face of the mushroom is two layers of 6" cake. That tier was also covered with fondant and I added the eyes. That one was pretty easy.

The top layer was the tough one. It was two layers of eight inch diameter cakes with a little bit of the 6" leftover cake that I took off to cut down the height of the 6" layers. I then had to shape the mushroom top. The top was covered with buttecream icing to make the fondant stick and then covered with green marshmallow fondant. The white spots were spaced out somewhat evenly to give a good view from all sides.

I got to the site and set up the cake. While I was setting it up, there were classes going on and several parents sat around and watched me finish the cake. I asked a couple of times if it was a cake or not. When the mother of the birthday boy got there, she had some Mario Kart cars to put on the cake. I knew she was going to bring some figures, but I didn't know they were Mario Kart, or I would have used that theme. It worked out great though, because there was just enough room around the edges of the mushroom to put the carts around the top of the lower tier. I absolutely love how it turned out.

0818121302, Uploaded from the Photobucket Android App

Jungle Baby Shower

One of my brother's good friends is a veterinarian. She's extremely nice and was having a little girls. My sister-in-law asked if I would do the cake for the shower. She had definite ideas about what should be on the cake. She wanted two tiers with one tier being white and the other chocolate. It got interesting from there. She wanted a checkerboard pattern on the bottom and jungle wildlife on the top with vines and vegetation. She had a material swatch that was going to be used in the nursery as a reference material. I had fun with it from there. The colors were a light green and apricot, which is an interesting combination that works somehow.

imagejpeg952_2, Uploaded from the Photobucket Android App

Now, I finished this cake on the same day that I did the red wedding cake. It was a busy week. I don't want to do that again. It's way too much work to do two cakes of that size in one week when I'm doing it in the evenings.

imagejpeg952_5, Uploaded from the Photobucket Android App

The cakes were first covered with buttercream, then I put a thin layer of fondant over them. Next, the animals and checker board pattern were made from marshmallow fondant as well. I kept everything very thin so it wouldn't be too chewy when all stacked up. The vines on top are buttercream.

imagejpeg952_3, Uploaded from the Photobucket Android App

To make things even more interesting, I was not delivering this cake. Since it was so far away and I had to deliver the wedding cake on the same day, we decided that my brother would bring the cake, stack it, and pipe between the layers. I sent the leftover icing to do that. Since I wouldn't be there, I sent the instruction to get pictures once the cake was complete, so I didn't take these. I got them in my inbox as I was setting up the wedding cake and was pleased with the result. I get a little anxious when I'm not the one finishing up the cake.

imagejpeg952, Uploaded from the Photobucket Android App

Motorcycle

I've realized there is an issue with some of the motorcycles out there. They look like scooters when you see them from the right angle. A friend asked me to make a motorcycle cake for a friend of theirs. I figured it would be a fun challenge. I got the pictures of the bike in question, and we talked it out. We figured the front view would be the easiest to put into cake form. The cake itself was chocolate with chocolate buttercream covered with marshmallow fondant.

0810120605-1


As I started working this, I carved out the shape needed and then started covering. First I put on a thin layer of gray fondant to act as the metal surfaces. Then I layered on the red and black where needed. Finally, the headlight was added. The headlight details are simply painted on with thinned cake dye.

Once it was put together, I realized just how much this thing looked like a scooter. I wasn't happy with it, but it was too late to do too much about it. I didn't hear any complaints, but I was personally disappointed that it didn't look cooler than it did. In retrospect, I would have preferred to go with a side shot.


0809122224-1

Friday, November 9, 2012

Interesting Red Wedding Cake

This one is another interesting story. I got a text from a good friend of mine. He's one of those guys that would literally give you the shirt off his back if you needed it. He had a friend and co-worker that needed a wedding cake done and wanted a quote from me. I gladly gave him one for the size they were asking for, and the rather cryptic description he was provided. His friend opted to go with me after talking to a few other people.

I talked to the mother of the bride and got the specifics. That's where it got tricky. The description of what the bride wanted was rather unique. They wanted a tier of white cake, a tier of chocolate, and the top tier made of red velvet. Each tier was to be decorated differently. The bottom was to be wrapped with a wire edged ribbon, the middle covered with red swirls and the top covered with small broken red candy. It took me a while to ferret out those details to the point I felt comfortable with the idea that I could make a cake resembling the description.

To make the story even more interesting, I got this order only about a week before the wedding. I figured there had to be an interesting story behind it, because nobody orders a wedding cake a week before their wedding.

The two bottom tiers were covered with fondant. The red swirls are buttercream icing. The top tier was covered with buttercream icing, then I pressed in large clear ruby red sprinkles until it was completely covered.

0804121655-1

I made the cakes and delivered them across town as well. I set up the cake by simply stacking the layers and putting a red border between each layer. They had also requested that pearls be incorporated into the cake somehow (lots of design elements on this one!), so I got some edible pearl candy and pressed it into each of the red border dots. I takes a few minutes, but it is a nice touch of elegance.

I had to wait around for the mother of the bride so I could get paid. She also brought the cake topper, which I thought was a nice touch. I'm not sure why they ordered a huge layer of chocolate cake for the bride's cake, because the grooms cake ended up being a huge chocolate cake covered with chocolate dipped strawberries made by a friend of theirs. They certainly didn't need more chocolate. It turned out that the person with the money showed up late, so I ended up staying through the ceremony to get paid. It was sort of weird because I was in shorts and a t-shirt and everyone else was all decked out. I couldn't help it though. It wasn't my fault I was still there. The wedding was at one of those event centers where everything (ceremony, reception, pictures, etc.) occurs within about a 40 foot diameter.

I found out from my friend that the person they were going to have do their cake backed out after either a falling out or after some changes to the cake, I'm not sure which. It was way late for someone to back out like that, so they scrambled to find someone who could do it on a tight budget. The cake wasn't real detailed or difficult, so it wouldn't have been a big problem for anyone who could bake.

New Bon Bon Mold

Since making the chocolate bon bons out of the chocolate cake and chocolate buttercream icing, I've tried other combinations. I still haven't tried a red velvet and cream cheese icing one yet, but it's on the list of things to attempt. To hopefully make the bon bon creation process easier, I ordered some bon bon candy molds to try out. I wouldn't say it took less time to make the bon bons this way, but it caused fewer headaches.

0724122113

I really don't enjoy the whole dipping in chocolate thing, so I was looking for something different to try. What I did with the molds was paint the chocolate on the mold first, let it set up, then put the filling in a zip top bag. After cutting a small corner off of the bag, I piped the filling into the molds. After that, I simply had to drizzle a little chocolate on the "bottom" surface to seal the filling in.

Previously, what I had to do was chill the filling, roll it into small balls, chill it more (cold enough to stand up to the melted chocolate, but not cold enough to freeze), dip the balls in melted chocolate and then make sure that enough chocolate dripped off that it wouldn't pool on the parchment paper when I set it down. It's a pain. To make things worse, if I did freeze the filling balls before I dipped them, there was provably a 50% or better chance that the chocolate coating would pop or crack open as the center warmed up because this filling apparently shrinks when frozen. As it warmed up, it would swell and break the chocolate coating open. I don't have that problem with the mold method, so I'm sticking with them. You also get that pretty finished effect and the cool little swirl on top without trying.

Look, Another Pool!

Here is another pool party cake. I wanted it to be a little different, so this time it wasn't a large pool with stuff around it. I opted to simply do a bunch of large pool accessories.

0630121135-1

The towel on the left has the child's name on it, as if you couldn't tell. I went for fairly bold colors for interest and contrast. The towel, goggles and flippers are all made from fondant. The cake's surface was buttercream icing dyed blue to at least remind you of water. The white highlights on the flippers are also piped buttercream. The name and stripes on the towel are more marshmallow fondant.

Just for full disclosure, I was working on this one late into the evening on a Friday. When I got done with the flippers, I noticed that one of the foot holes was larger than the other. I wasn't about to go back and re-build them because it probably would have involved me making a whole batch of fondant to do the fix. I just let it go, which is hard for me. I tend to be a bit of a perfectionist on my cakes if I have the time to do so.

Flowery Cake

I made this one for a co-worker at the office. I again got an image of a cake and they wanted something similar. For this one, I knew I would be making little flowers and I didn't want to do them all with icing. I found a nesting set of flower cookie cutters which were perfect for what I needed. There were three, but I only used the two smaller ones.

0517121718-1
The cake is covered with marshmallow fondant with fondant flowers covering the surface. Some of them are flowers within flowers of different colors. To give it an indention in the middle and make the flowers cup a bit, I pushed on the middle with a rounded tool I have for that purpose. The border around the bottom is not piped icing. It is made from little beads of rolled fondant. The name was painted right on the surface of the cake with dye for a drastic color effect.

Thursday, November 8, 2012

Hog's Head Cake

This one is one of my favorites to date. Of course, there is a story. Our neighbors and friends go hog hunting. Well, the father and son do anyway. They thought it would be a cool idea to order him a hog's head cake for his birthday as a surprise. These are the same people who I did the Xbox cake for, so they have pretty high expectations of what they get from me at this point. They gave me a few pictures of other cakes as reference material for what they were looking for. I like when people do that, because it helps me visualize what's in their mind as long as they understand that I always put my own spin on things.
  100_1954-1 
This one was a little weird. I started with two eight inch layers and two six inch layers. I then cut off one side of the stack to make a flat surface and turned the stack on it's side. This one was chocolate cake with chocolate icing. My chocolate cake tends to be extremely moist, so it's not always the best thing for something that needs a lot of structural support. It worked out though. I sent a text to the mom chastising myself for not thinking to make a red velvet cake with red icing or filling instead of chocolate. It would have made cutting the cake so much more fun.
  100_1950-1 
After turning the stack on it's side, I started carving out the shape. It's actually a reasonably easy shape to carve out if you have any type of experience doing that sort of thing. It's mostly just visualizing what you need and knowing you'll be adding another 1/4 inch or so of additional material over the entire surface, so you have to account for that. Once carved, I covered the whole thing with a light brown marshmallow fondant. I also had to cut out the ears pretty early and set them aside. For the ears to be sturdy enough to hold up to standing upright, they have to dry out for quite a while. Drying overnight is best. I actually set them in front a small fan to help out with the process. Marshmallow fondant tastes better, but it doesn't really ever get rock hard when you shape it, especially if you grease up your hands too much when you are working with it.
  100_1953-1 
Once the head was covered, I went about making it look a little more realistic. The fur effect was done with a fan paint brush and brown cake dye stippled directly on the fondant. I just dabbed it on until I got the color and effect I wanted. On the top of the nose, where I wanted it a little lighter, I simply put less on. The eyes and tusks are also made from fondant. The son saw this and loved it. It was a great reaction that I wish I had on film. Nobody wanted to cut it. Not because it looked cool but because it was sort of creepy to do so. The birthday boy cut off the nose and ate that himself. Even cut, people tended to steer clear of the eyes, because they were still sort of creepy. I am told that there wasn't any left by the time the party was over and this is a party where there were several desserts.

Chocolate Swim Cake

The instructions on this one were a little vague. It was listed as chocolate/chocolate. I had to assume that meant a chocolate cake with chocolate icing. That severely limits your color options. I decided to go with a sort of silhouette contrast effect. I though it turned out ok.
  100_1946-1 
As I mentioned, it was chocolate on chocolate with white buttercream decoration. All four sides and the bottom edge of the top surface were covered with various types of underwater plants and bubbles. You can get the idea of what the other sides looked like from the view above. The name was also made out of small bubbles. The dolphin, sand dollar and seahorse are cut out of fondant.

High Top Shoe Cake

For some odd reason, doing a shoe cake was on my list of things that I wanted to try. It just so happens that one of our new neighbors was talking to another one of our neighbors who I have made a whole lot of cakes for and was referred to me for her daughter's birthday cake. She gave me an invitation which looked like a pink high top shoe. I liked it immediately. Looking at the invite, I knew I could make it into a full stand-up shoe cake.
  100_1935-1
I believe the cake was white for this one, though my memory on the flavor is a little rusty since I've waited way too long to write about some of these. It stood four layers tall, which I then carved into the shoe shape I needed. It wasn't the most stable thing in the world since it was pretty narrow from side to side until I had it covered with marshmallow fondant. I covered the cake first with buttercream and also had buttercream between the layers.
  0616121046a-1
The grommets for the shoe laces and the shoe laces themselves were also marshmallow fondant that I cut out. I then carefully placed and tucked the shoe lace pieces to make it look like it was actually laced through. The tongue and white highlights were made from various layers of fondant. The girl's name is on the tongue.

  100_1937-1-1 
The stitching was kind of tricky. I used a really small tip to get the stitches as small as possible. It took a while, but it needed the detail to complete the effect. The logo on the side became the girl's age, which I thought was a nice touch. It was on both sides.
  0616121047-1 
I delivered the cake and the father was thrilled with it. As we sat and talked, his young son came up and hit the side of the cake. My heart stopped. Luckily, he only messed up some of the small dots around the logo, so we simply turned the cake around to the other side. I found out much later that the mom, who was the one who ordered the cake, expected just a shoe shaped cake that would be a one layer-type cake laying on a cake board. She didn't expect me to go all Da Vinci on it and make it look like a real shoe. She loved it though and the surprise made it that much better.

Out For A Swim

Here is another pool party cake. This time, I figured I would go with the basics. Oh look, it's a pool! Seriously though, the sides and water on this one were straight buttercream. I had some cookie crumbs left over from the sand castle cake, so I figured I'd use some here to great effect. The border of the bool is made from fondant tiles, which is a hold over from the first pool party cake I did with the gel in the middle. The water wasn't going to run out of this one, but it makes for a cool effect when you "fill" the pool after the tiles are put on. The "grout" between the tiles is more icing. I don't like to simply leave gaps, that's just not realistic. I threw on some pool toys and floats for decoration and a towel off to the side with the child's name on it.
  100_1943-1 
If you've been paying attention, you may have noticed that I don't write "Happy Birthday" on my cakes very often. I don't really see a point. You know you're at a birthday party and guess what, there is a birthday cake! Do you really need to write "Happy Birthday" on it? Nah. You sing it, they get cards, they're covered. If someone specifically asks me to put it on a cake, I do it. Otherwise, I leave it off and I believe the cakes look so much better for it.

Sand Castle Cake

I went through a spell of making lots of cakes for FINS (a great place that does swim lessons). I still make their cakes, but I was doing a lot of them in a short time frame and was challenged to come up with lots of swim theme cakes. I varied wildly because I'm not real keen on doing the same cake twice. I like for them to be unique. It's more fun for me, and makes it special for the customer as well when they know nobody has a cake like theirs. These were usually kids' party cakes. This one was fun to do.
  100_1926-1 
For some reason, many people like marble cake. I'm not sure why. Personally, I can't stand the stuff. I guess I'm more of a purist and like to taste the different flavors. You can't really do that with marble cake. It's a mash up of flavors that just don't work together in my opinion. I digress. This one was fun to make. The cake was a basic half sheet, which I covered with buttercream icing. The water was simply blue icing, but the rest of the cake was covered with crushed vanilla wafers (I used cheap dollar store generics which actually taste better than the name brand) to give the cake a sand look. If you ice the cake and stick the crumbs on quickly, it work's like a charm and looks great. The sand castle, bucket and shovel are made from rice crispy treats which were then covered for effect. The sand castle was covered with icing then the cookie crumbs. I wanted the turrets and door, so I had to do some carving. If you make rice crispy treats with less marshmallow than what the recipe calls for, they turn rock hard when they cool. Not that I like to eat them that way, but they are excellent for sculpture at that point. I covered the castle with the icing then pressed in the cookie crumbs. The bucket and shovel were covered with fondant to give them the smooth look. The top of the bucket was filled with crumbs to make it look like it was filled with sand. I simply used my finger to push down the icing and sand and spell the kid's name in the sand on the shore. I thought it turned out great and I got lots of compliments on this one.

Wednesday, August 22, 2012

First swim party

There is a good story behind this one. We were at the place where my son takes swim lessons one day and idly talking to the manager. Nobody else was there, so we sat and talked for a long time. She's real nice and chatty, so we get along well. She was talking about the parties they do there and talked about all of the woes they've had with the cakes. They had to drive a great distance to get cakes for the party to get them from one bakery where their other branch orders from. They asked if we knew anyone who did cakes. My wife just pointed at me. We started talking and I agreed to make them a couple of samples so they could try my more common and typical recipes. I brough those over then next week and they were a hit. However, the owner was still not convinced. He wanted to save a bit more money and possibly use one of the local grocery store bakeries to make the cake. The manager pressured him into using me so that their clients would get a much better product and it would be more customized. The owner relented and I started filling orders for them. Since this is a swimming party, I wanted to go with that theme for their cakes. The first one I made for them happened to be a pool. I took some risks on this one though. I wanted to get the water effect, so I tried making piping gel for the first time to get the clear water effect. It worked beautifully, but was nerve wracking. Since I worked on the cake late into Friday night and again Saturday morning, there was no chance of fixing anthing if things went catastrophically wrong. The gel was m biggest worry. Never having used it before, I was concerned that it would either break down on me and ruin the rest of the cake or leak around the sides and do the same. I tried to mitigate that as much as possible with the design, but I still didn't know for sure. Piping gel has to be cooked. Therefore, it has to be cooled before putting it on the cake. Since I was using a lot, I made the gel on Friday night to use on Saturday. When I went to bed, it was still warm and didn't look quite thick enough to me, but it turned out fine in the morning.
  100_1904-1 
If memory serves, the cake was white and I used white buttercream over it. The edges of the pool are fondant. The letters on the bottom of the pool were made from fondant as well and are formed from lots of individual blue "tiles". The morning I had to deliver, I put the letters down then poured the piping gel over the letters. Since put put the tight fitting fondant tiles on the edge of the pool. The served as a barrier for the gel and kept it in place. After pouring the gel, I then made little lane marker floats out of fondant and set them gently in the gel. I then connected the floats with lines of thin buttercream icing. The end result looked cool. It really had the effect of looking through water at the bottom of the pool. It isn't the easiest thing to make out in the pictures, but the one below shows a little bit of the glare from the gel when taken at an angle. It looked much cooler in person.
  100_1905-1 
I had leftover fondant after doing the pool sides, so I made the waves to go around the sides of the cake. It just added a little more interest. It was really well received, so my cake making days for FINS had started.

Churchin'

I don't get a lot of requests for religious themed cakes. I did the cross previously, so this is only my second. This one was for a Christian school that one of my co-worker's kids goes to. They came up with the concept. I think they use the sun as one of their logos at the school, though it is not the actual school logo. It went with the theme though. They also wanted it to be colorful. The concept I chose was a bit challenging. The multi-color border had to be piped one color at a time. I had four icing bags with the different colors, and I simply alternated each scallop as I went. It took a little while, but it looked pretty cool when finished.
  100_1918-1 
As I recall, the cake was half white and half chocolate with white buttercream icing. It did lead to me getting another order from one of the employees or parents attending the event.

Simply chocolate

This one is a huge hit and I've made plenty of them. It's a simple chocolate cake covered with chocolate buttercream icing. I also tried out the new mega star tip on this cake to see what it would look like. The borders were monstrous! I had plenty of icing, so it wasn't a problem. I like the huge border look when it's on a plain cake like this. It adds interest.
  100_1914-1

Cupcake frenzy

These were made for Admin Professionals Day. I had a request from one of my co-workers to make these for their administrative assistant. I gladly obliged. I had a bunch of cupcakes to make during this week. The chocolate buttercream on chocolate cupcakes were for the admin.
  0424122152b-1 
They were very well received by the staff and I had people come by throughout the day and give me compliments. Interesting since I've brought in my chocolate cake made the same way and people have been pretty quiet on the matter. I did use the opportunity to try out my new icing tip for cupcakes. It's the biggest star ti I could find and it makes some really great looking cupcakes. During the same week, I was asked to make cupcakes for someone's birthday, by them. That's always weird to me. I sort of feel bad when someone orders their own cake or cupcakes and pays for them. Happens all the time though. These were gluten free cupcakes where I didn't even have to buy the mix. The birthday girl provided them for me, though I offered to make it from scratch. They wanted girly, so I recommended pink. Below is the result.
  100_1911-1 
Looks girly enough to me. I dyed the cupcakes pink as well, so you couldn't get away from the color. I also found these really cool clam shell cupcake carriers at the cake supply place. They are awesome for storing and transporting cupcakes.

Another pink one

I have gotten more traction out of this cake design than any other. People are creatures of habit and some just keep ordering this one in different guises. This one is again white cake with white buttercream icing covered with pink marshmallow fondant. The letters used the edible silver candies and there is edible glitter sprinkled on top by request.
  100_1902-2

Monday, March 26, 2012

A non-baked item post

All my posts so far have been of things I've made. I had a couple of things that I wanted to share that are baking related, but are not things that I've baked. First, the best item I've found in quite some time. It's called a beater blade. They make them for most major mixer models and this thing is awesome. I stumbled across it one day and decided I had to try it. This thing is cool because it has rubber fins on the sides of the beater attachment so it scrapes the bowl as it mixes. It works amazingly well. The only part of the bowl that you may have to scrape down is the part above wherever the beater blade comes into contact with the bowl. When you have to make a lot of icing, cookies or whatever, this thing is a major time saver. I have no affiliation with the company, nor am I sure who they even are, but I can't recommend this thing highly enough.

Photobucket

Next, I had a pouring shield for my mixer, which never worked quite as well as I would have liked. It kept in maybe 25-50% more of the stuff that tended to fly out of the bowl when you mixed, but it still allowed a lot to fly out. The inevitable mushroom cloud from when you make icing was still terrible. That, and the stupid little plastic clips that connect the two halves of the pouring shield break really easy. I did like being able to pour things in slowly down the little ramp, but it still made a bit of a mess.

Photobucket

Note: I took a quick picture without cleaning up the mixer. Note the massive layer of powdered sugar on it?

When I was making the wedding cake, I knew I would be making a LOT of icing and I didn't want to make a huge mess of the kitchen from the powdered sugar cloud, and I didn't want to inhale that much sugar either. (I could get all graphic and describe what it does to your nose after you breathe near a mixer while making about 10 batches of icing, but I won't. I think you can figure it out.)

After I make icing, bread, or whatever, I usually put a nifty bowl cover on the bowl to keep it from drying out. These are made by the company, and they work moderately well. They slip off rather easily because the lip just doesn't go down the sides quite far enough. They do stay on most of the time though. They have a little well in the middle so that you can put the bowl cover on, and still put it on the mixer's stand since the drive mechanism sticks down a bit below the bowl's sides.

Photobucket

When I was going to be making a whole bunch of icing, I needed a better solution than that terrible pouring shield, so I got an idea. I took a utility knife to one of my two bowl covers. I didn't know if it would work, but I needed to try. I cut off about half an inch from the middle well of one of the bowl covers, opening it up. I figured that if I cut up just high enough that the beater blade mounting post would just clear the bowl cover and I could leave the bowl cover on while I mixed, limiting the mess. I had to put the bowl cover on, then attach the beater blade to the post afterwards since the blade will obviously not fit through the hole from the top.

Photobucket

This was a HUGE success. After trying different means of mixing everything in the bowl by pouring some sugar in and mixing before adding the rest, I realized I could just dump it all in and go in one shot. The little bit of powder that came up through the center hole was negligible and I just let it run until it looks like everything mixed. I did have to scrape the top of the bowl sides since it is obviously going to throw powdered sugar everywhere in the enclosed space, but one scrape of that little area and the icing is done. Subsequently, on the baby shower cake, I had to make a icing and a whole bunch of fondant too. It worked equally as well for fondant with the bread hook. (I don't usually knead the fondant by hand if I can help it.) I may need to buy another set of bowl covers so I can have two again, but this was well worth scrapping out one bowl cover for a mixing shield that actually works. Granted, adding ingredients now means popping off the cover and adding it, but that is a trade off that I gladly make to keep the mess to a minimum. If there are not a lot of powdered ingredients in a recipe, I can still use the pouring shield, but for ones that tend to throw dust out everywhere, my new mixing shield is the only way to go.

Sunday, March 18, 2012

1st Baby Shower

This one was interesting. My friend and neighbor called to ask if I could do a baby shower cake not long after I was asked if I could do the wedding cake. Luckily, they weren't on the same weekend. The mom to be had some ideas about what she wanted for her cake. She wanted three tiers, one with sports, one with the baby's name, and one with musical instruments. Since we had a few weeks, there were some other requests that came up as they had time to look at some other cakes for ideas. They liked the idea of having baby feet on the top instead of little booties, like some other people do. Also, they liked a cake they saw that had blocks in the middle of the cake. However, they figured that spelling the baby's name would look cool since the name is only four letters. They gave me lots of pictures for inspiration.

Photobucket

The cake itself is white and chocolate marble. There was butter cream icing under the fondant. There were two additional blocks left over since I used an 8 inch square for the blocks, so I left the two spare blocks (without detail decoration), in the event they needed more cake. The bottom tier is a 10 inch round, and the top tier is 8 inch. To hold each tier up, I put plastic drinking straws through the layer below. The trick was balancing the top tier over the blocks so it would be stable.

Photobucket

Note that the top tier is not centered over the bottom one. There was one thing that I did not account for when picking the sizes for my layers. I made the bottom 10 inch, when it would have been better for me to make it 12 inch instead. The reason is that I used the 8 inch square for the middle and cut it into four quadrants. That made each block 4" square. Now, originally I planned to use three blocks on the cake. Unless I positioned them just right, that wouldn't have worked out too well unless I cut off the back of the blocks and just made it look like they were whole. I already had them mostly decorated, so that wasn't going to happen. Consider for a moment if you have a 4" square and you want to put two inside a 10" circle. It's easy if you put the flat sides together, but if you turn them you have a problem. If you look at the positioning of the two blocks, they overlap each other a bit to get them to fit on the cake. Not exactly what I had planned, but it worked in the end. It did make offsetting the top necessary though. It makes it look a little more whimsical though, so I didn't really mind, and nobody at the party was complaining about it.

Photobucket

If you look around the cake views, you can see all of the items added. For sports, there was a basketball, soccer ball, goal posts, and a football. For music, there were musical notes, a guitar, and a drum. I realized as I was writing this that I forgot to put on drumsticks, which I meant to add. Too late now.

Photobucket

Above is a top view so you can see the feet. The little wrinkles in the feet don't really show up in that view though. You can see them in some of the other pictures.

I'm told that every bit of the cake was consumed, except for the blocks. The parents to be wanted to take them back to their military base to everyone could see them. I'm guessing they'll get eaten there.

Sunday, March 11, 2012

1st Wedding Cake

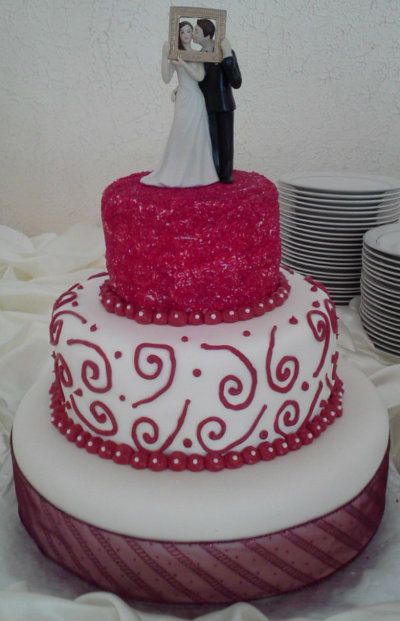
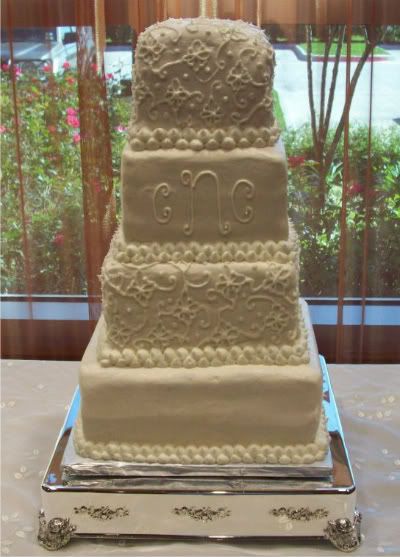
I've done a groom's cake, but not a wedding cake so far. I finally had a couple in the office ask if I would do their wedding cake. She sent me some pictures to get an idea of what she wanted and to price it. I gave her the price and she later came back and said that she wanted me to do it. Over the couple of weeks after that, we talked more about it and the design changed a bit over time. It got a little more complicated, but it was balanced out by not having to do detail work on every tier. They weren't sure if they were going to have to feed 150 or 200. It ended up being 200, which I had planned for. She didn't want any fondant, so it was only going to be cake and butter cream icing. She also wanted a more box-like look to the cake, so each tier needed to be three layers of cake. I also offered to make the icing on the cake a slightly off-white color so that the white decorations would stand out. You can't really see it in the picture, but the base coat of the icing was an ivory color and the accents were a stark white. Even up close, the difference was subtle.

Photobucket

My wife and I started this one early in the week. She did a majority of the baking for me, because there was so much to do, there was no way I would have finished the cake in time for the Saturday wedding. We baked four 12 inch square cakes, three 10 inch squares, and three 8 inch squares. The top tier was made out of a 12 inch square cut into 6 inch pieces. Because the layers were going to be so heavy, I used two layers of plastic cake board under each layer. The bottom tier sat on a piece of plywood which was covered with aluminum foil, then cake board foil. To support the tiers, I used PVC pipe which I washed, sterilized and washed again. I wanted to make sure that this thing wouldn't fall.

I didn't start decorating until Friday night. I covered all of the tiers with crumb coat, then by the time I finished the last one, the first one was ready for the final coating. That actually took most of the evening, because I had to constantly mix icing throughout the evening. I went to bed around 1:00 am with all of the cakes covered, but no detail work. With a lot of work left to do, and the stress of wanting to make sure I get it right, it wasn't the best night's sleep I've ever had.

I got up at 6:00 am and started working once I had my tea to wake me up. I put the detail work on the second and top tiers. This design is a smaller version of the design on the lace of her dress. I filled in some of the space with a few more curls and dots, but the design was essentially the same. It didn't take too long to put the design on the two tiers. I decided to put the monogram on the third tier once I got to the reception hall. That way, if there was any shifting of the icing on the way there, I could fix it and then put on the monogram. The letters only take a minute to put on, so that wouldn't be a big deal. The piping between the layers to cover up the cake board would obviously wait until the cake got to its destination.

I refrigerated the top tier because it was such a strange shape. Since it was as tall as it was wide, I was worried about that one falling over. Chilling the icing gives it a little more stability for the trip. Since that one was likely to have stability issues, I wanted to make sure it survived transport.

I loaded everything up in the car and headed out at about 12:30 pm on Saturday. I had planned to be at the reception hall at 2:30 pm, but figured I would give myself a little more time than I had originally planned. It always seems to take longer than you plan, so I gave myself another hour. I called the reception center and made sure that I could get in. The drive from my house was almost an hour. I put down a comforter on the back of the car to soften any bumps and vibrations and set off.

I got to the reception center around 1:30 pm and started work. the bride had mentioned that the center had a shield to put up if the sun was coming in through the windows. The sun wasn't really a problem, but the room was really hot when I arrived. They hadn't turned it down yet for the event. I was there for about an hour before the guy who knew how to operate the A/C showed up and cooled it down for me. I was sweating, literally, up to that point. The bride gave me the silver cake stand to put the cake on. The thing was gorgeous. I didn't want to touch it and put finger prints on it and ruin the effect of that perfect shiny finish. I opened up all of the cake boxed and everything had survived the trip! One hurdle down. There is always a pucker factor when transporting, because one serious bump and you could lose a lot of icing. There were a couple of spots on the second tier where the design formed a few breaks in the lines, but those are easily fixed.

I stacked the layers and made sure that everything was straight. I then used a wet spatula to glaze over the icing on the smooth tiers. This gives it a perfectly smooth finish and a slightly hard crust on the outside once it dries. I then piped the icing between the layers to cover up the gaps and cake boards. I put on the monogram of their initials and then started looking the cake over. The combination of the trip and the heat of the room had taken a toll on the icing. There were definitely points of stress on the cake where you could see the icing had softened. The second tier from the bottom showed the most weakness. I shored up a few spots with extra icing I had and smoothed it out at much as I could between the lines of the design. It wasn't perfect, but I tried to make it as clean as possible before everyone started showing up and I had to leave. I sat around and fiddled with it as long as I could, because I was really worried about the toll that the heat had taken on it. The top tier had a glazed look, but all of the icing seemed to be intact, so i didn't touch it. Finally, at around 3:30, I left the reception hall and hoped for the best, but feared that things would not remain as I left them based on what I saw.

I had to wait until Monday to find someone who had gone to the wedding and get a status. I asked if anything had gone wrong with the cake. They said that there was a corner of the top tier that came off. The icing took a small part of the cake with it. He said that they simply turned the cake and put that part in the back. Of course, that means that the letters would be on the side or the back as well. He said it tasted great though. So, now I'm waiting until the couple gets back from their honeymoon to see how catastrophic it may have been to the event. Luckily, the bride is pretty laid back, so it may not be too bad. I'm fairly sure that the cake would have been fine after the trip if the room had been cool, but with the combination of the trip and the heat, something bad was bound to happen. I may put an update on this post once I talk to the couple again and see what their reaction was.

This cake was very stressful. Knowing it is for a wedding and wanting it to be perfect provides a little more pressure than usually. Then there was the sheer size of the cake. It would have been really rewarding if the delivery and ceremony went off without a hitch. It's unfortunate that this first foray into wedding cakes had to have an incident.

Update: I talked with the bride and she said that they didn't really even pay attention to the smal part of the cake that came off. In fact, since the people working the reception hall turned the cake, they really didn't notice. The fact that the monogram was turned to the side wasn't a big deal either. She said that the only bit they tried were the bites that they fed to each other and that they were probably going to tear into the top of the cake that was kept in the next week so that they can actually have some of it and enjoy it instead of a year from now when it's not going to be nearly as good.

Football

I'll be the first to tell you that I'm not a football fan. I'll watch an occasional game, but I just don't really have any interest in professional sports. However, my neighbor loves the Houston Texans. She wanted a Texans cake for her birthday. There were several ideas kicked around like a football with the logo on it and maybe one or two more. In the end, I decided on simply doing the team logo.

Photobucket

The cake was white with a white butter cream layer and a fondant covering. The colors of the logo are fondant as well. There is an odd optical illusion in the picture where it looks like the blue hangs off the side of the cake. In person, it didn't, but whatever angle I took the picture at, it looked like this. Weird. I finally gave up and kept the picture. I ended up not charging her for the cake since she ordered it for herself and she's ordered several cakes for me.

The cake was a huge hit with the family. They had several of the extended families get together as a combined birthday party. There were three cakes at the party and mine went first. She said that the other cakes were barely touched even later in the party.

For a Golfer

A co-worker who has ordered from me several times in the past wanted a cake to feed a small crown for a surprise party. The person it was for was in his seventies, served in three different branches of the military. He was in to golf, so they wanted a golf themes cake.

The cake was chocolate with chocolate butter cream icing. The writing and grass were regular butter cream icing. I used a hair/grass icing tip for the grass. It's a cool tip, because it covers a small area pretty quickly and you end us with this fuzzy look. Not pictured is a hole flag that I made for them to stick in once they got to their final destination. The flag was made from a bamboo skewer and a small piece of paper with a 1 on it.

I'm told that the birthday boy loved the cake and the surprise party. The cake lasted until the second day, since there was more than enough to go around. I'm told that some people had it with their coffee the next morning.

Photobucket

Skylander Cupcakes

I asked my son if he wanted a cake or cupcakes for his birthday and he said he wanted cupcakes. You would think that cupcakes are easier to make than an actual cake, but that's not always the case. It's true if you're making a small batch, like one recipe. When you make reveral recipes worth of cupcakes, it increases the time to decorate significantly since you have to decorate each one separately. I took a beating with the stein cupcakes because they were just so labor intensive. I personally like cupcakes, but I don't really care for decorating them.

Since the boys are in to Skylanders and the things that my son wanted the most for his birthday were a few skylander figures, I figured I would tie that in to the cupcakes. Skylander figures are broken up into eight elements. They are earth, fire, wind, undead, tech, water, magic and life. I decided to put the element symbols on the top of the cupcakes. I ended up with 22 cupcakes, so most of the symbols were put on three cupcakes and a couple of them were only on two.

Photobucket

Photobucket

It's an Oktoberfest Carnivale

This was an interesting request. A co-worker called me asking if I could make some cupcakes for a bridal shower. The theme was a combination of Octoberfest and Carnivale since the couple had those backgrounds. The invitation had a stein with a big plume of feathers coming out of the top. They were also giving away gummy bears as part of the party favors.

I stewed on this one for a bit before I came up with the design. The person ordering wanted an example, which I typically don't do, but made an exception in this case. I made a couple of examples. One was a flat option where the stein was cut out of fondant and laid on the cupcake. The other was the more 3D vertical option that I ended up with.

Photobucket

Photobucket

Beleive it or not, the vertical stein was easier than the one laying flat. I had to cut out the one laying down freehand, and it took a while. I liked the result, but I would have had to charge an arm and a leg for those. The vertical ones took some time, but were a lot easier to make. I only had to worry about stability with those, which I figured I could handle.

She wanted half chocolate and half white cupcakes so people could choose which ones they wanted. There were also going to be up to two cupcakes per person, so I think I ended up doing close to fifty. The steins are made from marshmallow fondant, with butter cream icing highlights and foam on top. I then attached a yellow gummy bear to the side of the stein to pull in that detail as well. The feathers in the top are real. I glued the feathers to a sucker stick and pushed that down through the stein and cupcake to stabilize them.

Photobucket

Photobucket

Saturday, March 10, 2012

Christmas Tree

My neighbor asked me to make a cake for her mother that they were going to bring over for Christmas. She brought me a picture of one that her mother was absolutely in love with. After examining the picture for quite a while, because it was fairly low resolution, I realized that the tree in the picture was made of fondant or sugar paste. The person who made the original cake in the picture wanted to reuse the tree. I didn't like that idea, so I started modifying the cake design.

I decided to use cookies for my tree. I have a nesting star cookie cutter set. The problem is, one of the cutters is missing. Regardless, I made some sugar cookies and started cutting them into the various sizes I would need. I had to manually cut out the start in the size I was missing. After the cookies cooled, I glazed them with royal icing and stacked them up in a spiral pattern so it would look more like a tree and not a stack of cookies. After that, I piped in "ornaments" for the tree and little icicles. Some of the ornaments are tiny balls of fondant.

Photobucket

The cake was white with butter cream icing. The presents under the tree, including the bows, were made from marshmallow fondant.

This cake worked out great. The kids ate the cake, and the adults sat around eating the cookies with their coffee since it was pretty early. The mother loved the cake so much that she cried when they gave it to her. I'm told that she also has a picture of it hanging prominently on her wall.

A Birthday Roast

My son wanted a Skylanders cake for his birthday. He waffled between a Starcraft theme and Skylanders, but Skylanders finally won out.

If you are not familiar with Skylanders, it is a game where you have this little figures that you put on a base that connects up to a game system. When you put a character on the base, you get to play that character in the game. It's been a huge hit since Christmas. You almost can't find these things in the store at all.

After working on ideas for a while, my son decided he wanted one of the characters called Ghost Roaster. Now, I could either to the character laying down, or use an idea that I had been wanting to try for a while. Originally, my wife and I came up with this idea for a Ben 10 cake. I won't explain who that is if you don't know. The idea is to take a character like this and copy it onto a transparency so that it looks like a projection coming out of the cake. That's exactly what I did here.

Photobucket

I made the base out of cake and covered it with a thin layer of fondant. Now, I only had a couple of hours to do this, so it is certainly not my best work. Normally, it would look more like the stone it is supposed to be made out of. I was pressed for time because we had a really busy week and lots to do to prepare for the party.

Once the base cake was done, I took a glob of the fondant and formed it into the base for the figure. I then took the transparency and bent is slightly before pushing it into the fondant base it had. It stood up perfectly. My son was happy with it, though I was a bit disappointed. I'm a bit of a perfectionist, so wasn't totally thrilled with this one.