Monday, February 28, 2011

"Camaro SS10"


Ok, so my son is a car nut. I knew he would want a car for his birthday cake, so we asked what kind of car he wanted. "Camaro SS10" was the answer. Not being a car nut, I had to look it up. I quickly realized that it was the same car as Bumblebee from the Transformers movie. My wife then asked what color he wanted before I could stop her. The reason being that I didn't want to have to do a red car. Getting red over that large of an area would be a pain. I could do it, but really didn't want to. Of course he immediately said, "red." I had to tell him no. We then settled on yellow and black. That was good, because I could find plenty of pictures of that! That's a car I could work with. The cake itself is a vanilla cake, not white. Good flavor. I put butter cream icing between the layers and covered the cake with it to make the fondant stick. It started as two layers that I baked in casserole dishes this time instead of cake pans. The size was about right, so I figured it would work out. This is the first time I've done a car in fondant. It's only the second time I've done a car, so hey, I figure I'm doing ok. The outside is the marshmallow fondant of course, with a few icing highlights. From start to finish, this took about 5 1/2 hours. That's from the time I started mixing up the batter until putting on the last detail. I'm going to start paying more attention to the time it takes, but because I'm curious how long some of the more elaborate ones take.


<

Photobucket


Sunday, February 6, 2011

"Ugly Little Spud"

My son wanted Slimer for his birthday cake this year. I've always been a Ghostbusters fan, and my son became a huge fan after watching the movies and then getting the video game (which is awesome on the PS3 by the way). I found a few pictures of slimer to work from. This one is a fairly close rendition of the picture I liked the best. The problem is that slimer is a ghost, so you can see through him. Try and turn that into an opaque cake made of icing. I'll admit that I struggled with planning this one. Until I started carving the cake, the design wasn't exactly set. I looked at the picture and started shaving. the folds of his belly are carved into the cake. His eyes and mouth are also carved in. Most of the other detail was made from building up the icing underneath the fondant to give it a little rise and texture. The cake was chocolate and below the marshmallow fondant is chocolate butter cream icing, my favorite. When I use fondant, I put a healthy layer of icing underneath so you can still enjoy the icing even if you hate the fondant.
After shaping the cake, icing it, and putting on the fondant, I pressed the fondant into the detailed areas for shape and accent. It was sort of like playing with a clay sculpture. The only thing was that if you push a little too much, you'll tear the fondant, and it's a very bad day. Luck was with me and I didn't do that. Once I had the fondant exactly how I wanted it, I rubbed the areas where I wanted darker shading with dark green pearl dust. The higher areas where I wanted highlights, I rubbed with white pearl dust. The green made it darker, and the white made it slightly lighter, but both make it shiny. The shine doesn't show as much in the picture, but it was a cool effect. Last, I piped the details on the face and around the base of the cake. Since the icing beneath was chocolate, it wouldn't do to have any chocolate peek out from beneath the green fondant layer. I was incredibly pleased with how this one turned out. It tasted great too. In fact, there was a boy at my son's party which doesn't like chocolate cake. We gave him a piece and he ended up scraping his plate clean. I call that a job well done. I usually have quite a bit of cake left over from my kids' parties, because I make them a bit bigger than necessary. A larger cake is sometimes easier to decorate for the things I often do. In this case, I was surprised at how much was eaten at the party. There was about 1/3 of the cake left for me to take up to the office the next day.

Gluten Free

This cake was my first foray into gluten free baking. A lady in my office is gluten free by necessity. Some of our co-workers were planning to get a cake to celebrate her marriage to another one of our office mates. There was great concern because nobody was sure where to get a gluten free cake from. I happened to walk up at that moment and offered to make the cake for them. They were greatly relieved. This was no small feat either, because we ended up having to go to my nephew's birthday party the day that I was planning to make this cake. I planned to make it from scratch. I bought all of the ingredients to make a gluten free flour mix to use in place of the flour and everything. I planned ahead though. As a precautionary measure, I bought a gluten free cake mix. It was a good thing I did. We didn't get home until late in the afternoon on Sunday, and I had to have the cake for Monday morning. I didn't want to take the chance on making the cake from scratch and messing it up. Since I have never made anything of the sort before, I didn't want to be up until midnight re-baking a cake so that it would be edible and presentable.
If you have never had gluten free baked goods, or don't know exactly what it's all about, I'll explain briefly. Gluten is the protein in wheat flour that binds things like bread together when you process the flour in combination with water. The yeast makes the bubbles in bread, but the gluten is the glue that holds the bread together and gives it the wonderful texture that I personally love. With gluten free baking, you don't have the flour, so you have to find substitutes for not only the flour, but also the "glue" to bind the mixtures together and give them form or texture. Different flours are used, such as potato and rice. For the binder, you have to use either guar gum, or xanthan gum. Most of this can be found in modern supermarkets in the health or gluten free areas. If not, they will be in pretty much any health food store, but will cost a little more there.
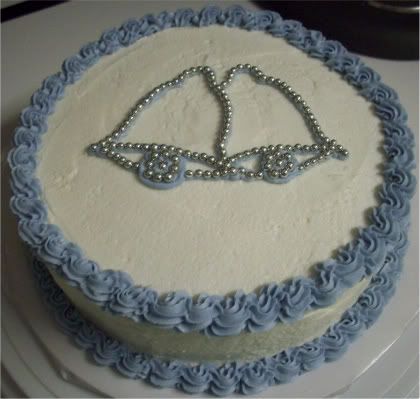
I have all of the ingredients to do some serious gluten free baking now, which I will experiment with, but as I stated before, the cake I made was a mix. It turned out pretty well. When it bakes, it rises to astronomical levels. It looked gorgeous when I took it out of the oven. I was so excited. Over the next 10-15 minutes, the cake deflated to something slightly thinner than a traditional baked cake layer. It looks different too. The outside has a slightly sticky or gummy texture to it. The inside isn't like that, only the outside, which is weird. It sure does help icing stick to it though. I didn't have to do a whole lot of leveling on the layers before I stacked them. I used my butter cream icing to cover the cake and put the edible silver candies on the bells. They wanted something simple since this was basically only going to be for one person. In fact, they only asked me to make something large enough for the one person who was going to eat it. I made the whole cake because I had the mix and it was just easier that way.
The cake was just ok when tried by itself. When covered with the icing, it was actually pretty good. I liked it better than the store bought cake that they got for the rest of the office to eat. So many people wanted to thy the gluten free cake that there wasn't much left, if any, for them to take home to the rest of their family. I was please how it turned out in the end, and the co-worker that I made it for thanked me repeatedly for making it for her. She'll be my guinea pig for future gluten free experiments, not that she'll mind.

Office Birthday

This one was a simple cake that I made for our admin. It was a white cake with buttercream icing. I wanted to do a different border than the typical scalopped piping, so I surrounded it with dots, then put colored dots on top of the white. Simple and elegant, but not too plain.

When Pumpkins Go Bad!

Halloween is big around our house. It ranks up there with Christmas as far as decorating goes. We're still working out what we want to to on the outside of our house for Halloween, but the inside gets decked out each year for Halloween. The above pumpkins were intended for our office pumpkin carving contest. However, I had a conflict and had to be out of the office on the day of the contest. It may have been a good thing though. The top pumpkin in the picture was really cool looking when I bought it. It was green with a little orange, and covered with warts. Over the week since I bought it, it turned more orange, which annoyed me greatly. It also did this weird thing where parts of it started to look like they were starting to rot. It was really spotty, and sort of added to the effect. The problem started when I began carving that ugly pumpkin. It looks really cool, but the skin on that thing was like hardwood. You simply couldn't carve the thing with a knife. It I had thought about it, I would have pulled out the power tools. I was wanting to just shave a little off the outside, but it couldn't be done. Normally, I would consider painting a pumpkin instead of carving it sacriledge, but it couldn't be helped here. My hands simply gave out from fighting the thing, so I bailed on finishing the carving and painted the rest. Not as impressive as I wanted, but entertaining.

Cheesecake for Thanksgiving

There was a benefit held at our office to raise money for a co-worker with cancer. I was asked if I could make something for the silent auction. They started by asking me to make a cake. I offered a better option. I submitted a coupon for a free baked item of their choice, with certain limits. The winner ended up asking for a strawberry cheesecake for Thanksgiving. This recipe baked up real nice, but I would probably double the amount of cheescake in this one. It ended up a little thin. It was a new recipe and I didn't take into account that my pan was slightly larger than the one the recipe called for. The guy who got it is pretty quiet, so I didn't ever get any feedback on it. I'll probably make it again, but I'll have to adjust the recipe.