Saturday, November 10, 2012

Gone Fishing

My sister-in-law's step father asked if I would do his retirement cake. He said he wanted it to look like the party invitation. When I got the picture, I almost said no, but then I decided I would take the challenge.

Even though he was "retiring," he had a boat and he decided to spend all of his time taking clients out fishing. Sounds pretty rough for someone who absolutely loves fishing. It's funny that people retire and then manage to simply find a different job.

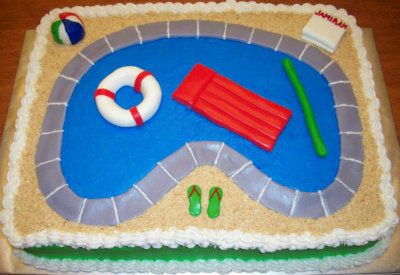
I took the picture, inverted it, and blew it up to 11 x 17 size. That way, I could do a buttercream transfer of the entire top of the cake. It would be far easier than trying to do it freestyle. I had also been wanting to try doing an entire cake's surface as a transfer since I figured it would provide additional stability to the image. If you try to do an image with a lot of detail without surrounding support for it, the details are likely to break off when you try to remove if from the plastic. I figured that one giant sheet of frozen icing would be pretty solid and easy to manipulate.

I had a pretty large bamboo cutting board that I taped the image to the back of. I carefully covered it with plastic wrap so there were no wrinkles at all. I then set about mixing the many colors I needed one by one and slowly built the image up from light to dark. Once I had the main image complete and all of the background details, I filled in the background water and sky. I then stuck the whole image in the freezer for a couple of hours. I was working on the previous Mario cake just before finishing this one, so it was another really busy day.

I took the image out of the freezer after it seemed to set up and readied to put it on the cake. The cake was covered with white buttercream and I tried to make sure it was still wet when I flipped the image from the cutting board over on the cake. This is a tense moment, because the image warms quickly after you take it out of the freezer and if it warms too much, there is absolutely no chance you will get a second attempt before it softens. You have to work quickly.

0818121840, Uploaded from the Photobucket Android App

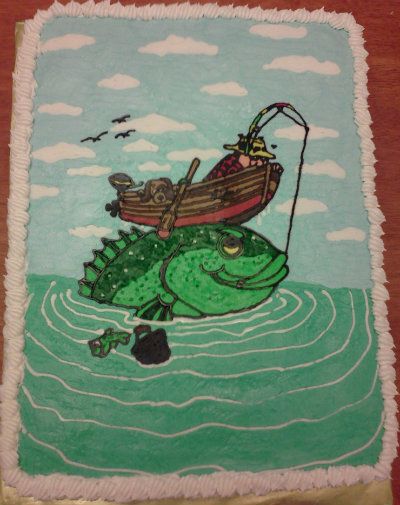
I managed to get the image almost perfectly centered on the cake and shaved off a little bit of the image that hung over the sides. I then piped around the top to cover the edges and the small gap between the icing image layer and the icing below it. I was piping the border just before walking out of the house. It was also a very humid rainy day, so the icing took a while to set up. Travelling without letting the icing crust completely is a dangerous proposition. I pushed it a little too much and the top border icing did shift a little bit. Nobody commented on it and I may have been the only person who really cared, but it bothered me. I actually like this type of image better than some airbrushed or printed image. It seems much more impressive when it's all made from icing, especially when it is a detailed image like this one.

Mario 1up

What better for a birthday than a 1up mushroom from Super Mario. This is another swim party cake, but for once the parent asked for a theme. Mario is certainly a theme I can work with. I got inspired by this one and did something way more elaborate than I would normally do for one of these.

0818121300, Uploaded from the Photobucket Android App

The base of the cake was a two layer 10" cake. It was covered with blue buttercream to make the sky background, then partially covered with fondant to represent the clouds. I made the castle from the game and the little shrubs with eyes that are so cool in the backgrounds. The castle has the child's age on it as a nice little touch.

0818121301b, Uploaded from the Photobucket Android App

The face of the mushroom is two layers of 6" cake. That tier was also covered with fondant and I added the eyes. That one was pretty easy.

The top layer was the tough one. It was two layers of eight inch diameter cakes with a little bit of the 6" leftover cake that I took off to cut down the height of the 6" layers. I then had to shape the mushroom top. The top was covered with buttecream icing to make the fondant stick and then covered with green marshmallow fondant. The white spots were spaced out somewhat evenly to give a good view from all sides.

I got to the site and set up the cake. While I was setting it up, there were classes going on and several parents sat around and watched me finish the cake. I asked a couple of times if it was a cake or not. When the mother of the birthday boy got there, she had some Mario Kart cars to put on the cake. I knew she was going to bring some figures, but I didn't know they were Mario Kart, or I would have used that theme. It worked out great though, because there was just enough room around the edges of the mushroom to put the carts around the top of the lower tier. I absolutely love how it turned out.

0818121302, Uploaded from the Photobucket Android App

Jungle Baby Shower

One of my brother's good friends is a veterinarian. She's extremely nice and was having a little girls. My sister-in-law asked if I would do the cake for the shower. She had definite ideas about what should be on the cake. She wanted two tiers with one tier being white and the other chocolate. It got interesting from there. She wanted a checkerboard pattern on the bottom and jungle wildlife on the top with vines and vegetation. She had a material swatch that was going to be used in the nursery as a reference material. I had fun with it from there. The colors were a light green and apricot, which is an interesting combination that works somehow.

imagejpeg952_2, Uploaded from the Photobucket Android App

Now, I finished this cake on the same day that I did the red wedding cake. It was a busy week. I don't want to do that again. It's way too much work to do two cakes of that size in one week when I'm doing it in the evenings.

imagejpeg952_5, Uploaded from the Photobucket Android App

The cakes were first covered with buttercream, then I put a thin layer of fondant over them. Next, the animals and checker board pattern were made from marshmallow fondant as well. I kept everything very thin so it wouldn't be too chewy when all stacked up. The vines on top are buttercream.

imagejpeg952_3, Uploaded from the Photobucket Android App

To make things even more interesting, I was not delivering this cake. Since it was so far away and I had to deliver the wedding cake on the same day, we decided that my brother would bring the cake, stack it, and pipe between the layers. I sent the leftover icing to do that. Since I wouldn't be there, I sent the instruction to get pictures once the cake was complete, so I didn't take these. I got them in my inbox as I was setting up the wedding cake and was pleased with the result. I get a little anxious when I'm not the one finishing up the cake.

imagejpeg952, Uploaded from the Photobucket Android App

Motorcycle

I've realized there is an issue with some of the motorcycles out there. They look like scooters when you see them from the right angle. A friend asked me to make a motorcycle cake for a friend of theirs. I figured it would be a fun challenge. I got the pictures of the bike in question, and we talked it out. We figured the front view would be the easiest to put into cake form. The cake itself was chocolate with chocolate buttercream covered with marshmallow fondant.

0810120605-1


As I started working this, I carved out the shape needed and then started covering. First I put on a thin layer of gray fondant to act as the metal surfaces. Then I layered on the red and black where needed. Finally, the headlight was added. The headlight details are simply painted on with thinned cake dye.

Once it was put together, I realized just how much this thing looked like a scooter. I wasn't happy with it, but it was too late to do too much about it. I didn't hear any complaints, but I was personally disappointed that it didn't look cooler than it did. In retrospect, I would have preferred to go with a side shot.


0809122224-1

Friday, November 9, 2012

Interesting Red Wedding Cake

This one is another interesting story. I got a text from a good friend of mine. He's one of those guys that would literally give you the shirt off his back if you needed it. He had a friend and co-worker that needed a wedding cake done and wanted a quote from me. I gladly gave him one for the size they were asking for, and the rather cryptic description he was provided. His friend opted to go with me after talking to a few other people.

I talked to the mother of the bride and got the specifics. That's where it got tricky. The description of what the bride wanted was rather unique. They wanted a tier of white cake, a tier of chocolate, and the top tier made of red velvet. Each tier was to be decorated differently. The bottom was to be wrapped with a wire edged ribbon, the middle covered with red swirls and the top covered with small broken red candy. It took me a while to ferret out those details to the point I felt comfortable with the idea that I could make a cake resembling the description.

To make the story even more interesting, I got this order only about a week before the wedding. I figured there had to be an interesting story behind it, because nobody orders a wedding cake a week before their wedding.

The two bottom tiers were covered with fondant. The red swirls are buttercream icing. The top tier was covered with buttercream icing, then I pressed in large clear ruby red sprinkles until it was completely covered.

0804121655-1

I made the cakes and delivered them across town as well. I set up the cake by simply stacking the layers and putting a red border between each layer. They had also requested that pearls be incorporated into the cake somehow (lots of design elements on this one!), so I got some edible pearl candy and pressed it into each of the red border dots. I takes a few minutes, but it is a nice touch of elegance.

I had to wait around for the mother of the bride so I could get paid. She also brought the cake topper, which I thought was a nice touch. I'm not sure why they ordered a huge layer of chocolate cake for the bride's cake, because the grooms cake ended up being a huge chocolate cake covered with chocolate dipped strawberries made by a friend of theirs. They certainly didn't need more chocolate. It turned out that the person with the money showed up late, so I ended up staying through the ceremony to get paid. It was sort of weird because I was in shorts and a t-shirt and everyone else was all decked out. I couldn't help it though. It wasn't my fault I was still there. The wedding was at one of those event centers where everything (ceremony, reception, pictures, etc.) occurs within about a 40 foot diameter.

I found out from my friend that the person they were going to have do their cake backed out after either a falling out or after some changes to the cake, I'm not sure which. It was way late for someone to back out like that, so they scrambled to find someone who could do it on a tight budget. The cake wasn't real detailed or difficult, so it wouldn't have been a big problem for anyone who could bake.

New Bon Bon Mold

Since making the chocolate bon bons out of the chocolate cake and chocolate buttercream icing, I've tried other combinations. I still haven't tried a red velvet and cream cheese icing one yet, but it's on the list of things to attempt. To hopefully make the bon bon creation process easier, I ordered some bon bon candy molds to try out. I wouldn't say it took less time to make the bon bons this way, but it caused fewer headaches.

0724122113

I really don't enjoy the whole dipping in chocolate thing, so I was looking for something different to try. What I did with the molds was paint the chocolate on the mold first, let it set up, then put the filling in a zip top bag. After cutting a small corner off of the bag, I piped the filling into the molds. After that, I simply had to drizzle a little chocolate on the "bottom" surface to seal the filling in.

Previously, what I had to do was chill the filling, roll it into small balls, chill it more (cold enough to stand up to the melted chocolate, but not cold enough to freeze), dip the balls in melted chocolate and then make sure that enough chocolate dripped off that it wouldn't pool on the parchment paper when I set it down. It's a pain. To make things worse, if I did freeze the filling balls before I dipped them, there was provably a 50% or better chance that the chocolate coating would pop or crack open as the center warmed up because this filling apparently shrinks when frozen. As it warmed up, it would swell and break the chocolate coating open. I don't have that problem with the mold method, so I'm sticking with them. You also get that pretty finished effect and the cool little swirl on top without trying.

Look, Another Pool!

Here is another pool party cake. I wanted it to be a little different, so this time it wasn't a large pool with stuff around it. I opted to simply do a bunch of large pool accessories.

0630121135-1

The towel on the left has the child's name on it, as if you couldn't tell. I went for fairly bold colors for interest and contrast. The towel, goggles and flippers are all made from fondant. The cake's surface was buttercream icing dyed blue to at least remind you of water. The white highlights on the flippers are also piped buttercream. The name and stripes on the towel are more marshmallow fondant.

Just for full disclosure, I was working on this one late into the evening on a Friday. When I got done with the flippers, I noticed that one of the foot holes was larger than the other. I wasn't about to go back and re-build them because it probably would have involved me making a whole batch of fondant to do the fix. I just let it go, which is hard for me. I tend to be a bit of a perfectionist on my cakes if I have the time to do so.

Flowery Cake

I made this one for a co-worker at the office. I again got an image of a cake and they wanted something similar. For this one, I knew I would be making little flowers and I didn't want to do them all with icing. I found a nesting set of flower cookie cutters which were perfect for what I needed. There were three, but I only used the two smaller ones.

0517121718-1
The cake is covered with marshmallow fondant with fondant flowers covering the surface. Some of them are flowers within flowers of different colors. To give it an indention in the middle and make the flowers cup a bit, I pushed on the middle with a rounded tool I have for that purpose. The border around the bottom is not piped icing. It is made from little beads of rolled fondant. The name was painted right on the surface of the cake with dye for a drastic color effect.

Thursday, November 8, 2012

Hog's Head Cake

This one is one of my favorites to date. Of course, there is a story. Our neighbors and friends go hog hunting. Well, the father and son do anyway. They thought it would be a cool idea to order him a hog's head cake for his birthday as a surprise. These are the same people who I did the Xbox cake for, so they have pretty high expectations of what they get from me at this point. They gave me a few pictures of other cakes as reference material for what they were looking for. I like when people do that, because it helps me visualize what's in their mind as long as they understand that I always put my own spin on things.
  100_1954-1 
This one was a little weird. I started with two eight inch layers and two six inch layers. I then cut off one side of the stack to make a flat surface and turned the stack on it's side. This one was chocolate cake with chocolate icing. My chocolate cake tends to be extremely moist, so it's not always the best thing for something that needs a lot of structural support. It worked out though. I sent a text to the mom chastising myself for not thinking to make a red velvet cake with red icing or filling instead of chocolate. It would have made cutting the cake so much more fun.
  100_1950-1 
After turning the stack on it's side, I started carving out the shape. It's actually a reasonably easy shape to carve out if you have any type of experience doing that sort of thing. It's mostly just visualizing what you need and knowing you'll be adding another 1/4 inch or so of additional material over the entire surface, so you have to account for that. Once carved, I covered the whole thing with a light brown marshmallow fondant. I also had to cut out the ears pretty early and set them aside. For the ears to be sturdy enough to hold up to standing upright, they have to dry out for quite a while. Drying overnight is best. I actually set them in front a small fan to help out with the process. Marshmallow fondant tastes better, but it doesn't really ever get rock hard when you shape it, especially if you grease up your hands too much when you are working with it.
  100_1953-1 
Once the head was covered, I went about making it look a little more realistic. The fur effect was done with a fan paint brush and brown cake dye stippled directly on the fondant. I just dabbed it on until I got the color and effect I wanted. On the top of the nose, where I wanted it a little lighter, I simply put less on. The eyes and tusks are also made from fondant. The son saw this and loved it. It was a great reaction that I wish I had on film. Nobody wanted to cut it. Not because it looked cool but because it was sort of creepy to do so. The birthday boy cut off the nose and ate that himself. Even cut, people tended to steer clear of the eyes, because they were still sort of creepy. I am told that there wasn't any left by the time the party was over and this is a party where there were several desserts.

Chocolate Swim Cake

The instructions on this one were a little vague. It was listed as chocolate/chocolate. I had to assume that meant a chocolate cake with chocolate icing. That severely limits your color options. I decided to go with a sort of silhouette contrast effect. I though it turned out ok.
  100_1946-1 
As I mentioned, it was chocolate on chocolate with white buttercream decoration. All four sides and the bottom edge of the top surface were covered with various types of underwater plants and bubbles. You can get the idea of what the other sides looked like from the view above. The name was also made out of small bubbles. The dolphin, sand dollar and seahorse are cut out of fondant.

High Top Shoe Cake

For some odd reason, doing a shoe cake was on my list of things that I wanted to try. It just so happens that one of our new neighbors was talking to another one of our neighbors who I have made a whole lot of cakes for and was referred to me for her daughter's birthday cake. She gave me an invitation which looked like a pink high top shoe. I liked it immediately. Looking at the invite, I knew I could make it into a full stand-up shoe cake.
  100_1935-1
I believe the cake was white for this one, though my memory on the flavor is a little rusty since I've waited way too long to write about some of these. It stood four layers tall, which I then carved into the shoe shape I needed. It wasn't the most stable thing in the world since it was pretty narrow from side to side until I had it covered with marshmallow fondant. I covered the cake first with buttercream and also had buttercream between the layers.
  0616121046a-1
The grommets for the shoe laces and the shoe laces themselves were also marshmallow fondant that I cut out. I then carefully placed and tucked the shoe lace pieces to make it look like it was actually laced through. The tongue and white highlights were made from various layers of fondant. The girl's name is on the tongue.

  100_1937-1-1 
The stitching was kind of tricky. I used a really small tip to get the stitches as small as possible. It took a while, but it needed the detail to complete the effect. The logo on the side became the girl's age, which I thought was a nice touch. It was on both sides.
  0616121047-1 
I delivered the cake and the father was thrilled with it. As we sat and talked, his young son came up and hit the side of the cake. My heart stopped. Luckily, he only messed up some of the small dots around the logo, so we simply turned the cake around to the other side. I found out much later that the mom, who was the one who ordered the cake, expected just a shoe shaped cake that would be a one layer-type cake laying on a cake board. She didn't expect me to go all Da Vinci on it and make it look like a real shoe. She loved it though and the surprise made it that much better.

Out For A Swim

Here is another pool party cake. This time, I figured I would go with the basics. Oh look, it's a pool! Seriously though, the sides and water on this one were straight buttercream. I had some cookie crumbs left over from the sand castle cake, so I figured I'd use some here to great effect. The border of the bool is made from fondant tiles, which is a hold over from the first pool party cake I did with the gel in the middle. The water wasn't going to run out of this one, but it makes for a cool effect when you "fill" the pool after the tiles are put on. The "grout" between the tiles is more icing. I don't like to simply leave gaps, that's just not realistic. I threw on some pool toys and floats for decoration and a towel off to the side with the child's name on it.
  100_1943-1 
If you've been paying attention, you may have noticed that I don't write "Happy Birthday" on my cakes very often. I don't really see a point. You know you're at a birthday party and guess what, there is a birthday cake! Do you really need to write "Happy Birthday" on it? Nah. You sing it, they get cards, they're covered. If someone specifically asks me to put it on a cake, I do it. Otherwise, I leave it off and I believe the cakes look so much better for it.

Sand Castle Cake

I went through a spell of making lots of cakes for FINS (a great place that does swim lessons). I still make their cakes, but I was doing a lot of them in a short time frame and was challenged to come up with lots of swim theme cakes. I varied wildly because I'm not real keen on doing the same cake twice. I like for them to be unique. It's more fun for me, and makes it special for the customer as well when they know nobody has a cake like theirs. These were usually kids' party cakes. This one was fun to do.
  100_1926-1 
For some reason, many people like marble cake. I'm not sure why. Personally, I can't stand the stuff. I guess I'm more of a purist and like to taste the different flavors. You can't really do that with marble cake. It's a mash up of flavors that just don't work together in my opinion. I digress. This one was fun to make. The cake was a basic half sheet, which I covered with buttercream icing. The water was simply blue icing, but the rest of the cake was covered with crushed vanilla wafers (I used cheap dollar store generics which actually taste better than the name brand) to give the cake a sand look. If you ice the cake and stick the crumbs on quickly, it work's like a charm and looks great. The sand castle, bucket and shovel are made from rice crispy treats which were then covered for effect. The sand castle was covered with icing then the cookie crumbs. I wanted the turrets and door, so I had to do some carving. If you make rice crispy treats with less marshmallow than what the recipe calls for, they turn rock hard when they cool. Not that I like to eat them that way, but they are excellent for sculpture at that point. I covered the castle with the icing then pressed in the cookie crumbs. The bucket and shovel were covered with fondant to give them the smooth look. The top of the bucket was filled with crumbs to make it look like it was filled with sand. I simply used my finger to push down the icing and sand and spell the kid's name in the sand on the shore. I thought it turned out great and I got lots of compliments on this one.