Friday, September 2, 2011

Chocolate Birthday

Photobucket

This one is fairly simple. I needed to feed at least 20 people at the office for a birthday. I had everything to make a chocolate cake, so I figured I would make a large round. This one is a 10" round, 2-layer cake. Each layer is the equivalent of a typical 8 inch round cake. The cake itself is a chocolate cake recipe that I started using with the Saints cake, and will continue to use until I find something better (which isn't likely). The cake contains chocolate pudding, chocolate syrup and cocoa, which makes it really chocolaty and incredibly moist. I almost can't over cook this thing. The icing is chocolate butter cream, which has both butter and cream in it in addition to a whole bunch of cocoa. All together, this thing is a 4" tall, 11" round (with icing) chocolate bomb. If you like chocolate, this is definitely the cake for you.

At one point, I opened the cake carrier I had it in for a moment and the chocolate aroma almost knocked me over. I figured that if I wanted to avoid eating all morning due to my stomach begging for food from the powerful aroma, I had better not open the lid again. It is an amazing scent though.

The lady who ended up cutting the cake was obviously used to smaller 8" cakes. She was cutting these huge wedges out of the cake for everyone. I honestly had trouble finishing mine because the piece was so large. A 1 1/2" wide wedge from a 10" cake is far different than a 1 1/2" wide wedge from an 8" cake. People seemed to enjoy it though. One of my employees actually got two pieces, and went back and cleaned the debris from the cake carrier to eat that as well. He's a bit younger than some of the rest of us and can probably still get away with that. I don't always get to enjoy my handiwork, but I knew I was going to be eating this one and looked forward to it. Granted, I enjoyed it while I was making it as well by sampling the parts that I cut away to level the cake, but I still looked forward to eating the finished product.

Saturday, August 27, 2011

"Monster" Guitar

Photobucket


This cake was for one of our neighbors who is a friend of my son's. She's a sweet girl and currently living with her father. Her mother is actually my neighbor, if you can follow that logic. Anyway, the mother sent me a text and asked if I would do a cake for her daughter. I was a little confused because she had asked me for a cake a couple of weeks ago and ended up cancelling, but I knew that she had a birthday party for her daughter. Well, she explained that the girl's father didn't have a party for her, in fact, he didn't get her a gift, a cake, or anything. I thought that was terribly sad, especially since I like the girl. All her mother asked me for was a cake in the shape of a guitar. No other directions or requests were given, so I started planning.

I knew that the girl's room was decorated in pink, black and white. I also knew from the many hours she has spent over at our house that she loves Monster High dolls. The fact is, so does my wife, and my wife has quite a few. I made a cake that would completely cover the cake board I had, and started carving. I didn't want the classic electric guitar look, so I opted for the more angular design. I had so much cake left, that I wanted to do something else with it. That's where the Monster High came in. I decided to duplicate the skull from the logo, and since it went with the pink, black, and white motif, it was perfect!

The cake is white, with white butter cream as a crumb coat and sticky layer. It is covered with the marshmallow fondant. The first layer of black that I put on the guitar was extremely dry and cracked a lot. I happened to have a lot of black left over from the Saints cake, so I simply covered it with another layer of black. For some reason, the liquid black coloring makes the fondant get all grainy. I need to stop using it, but it sure does get things black fast. What I did was nuke the ball o' black in the microwave until it was pretty much liquid. Then I let it cool just long enough to handle and rolled it out quickly and set it on the cake. This time it came out fairly smooth and I had only one or two slight blemishes on some of the sharper angles. The white fondant went on the skull easily. I mixed up the pink and cut out the stripes and bow to apply to the two cake parts. The rest of the detail is all butter cream icing. Now, when you draw lines on a white cake with a colored icing, slight irregularities don't show up too much unless the color it really dark. When you put a light color on a dark cake, you can see every little irregularity there is. I piped on the guitar strings, then added in the white lines for the neck and pickups. I had some icing left, so I put the little pearl necklace looking border on the skull and mixed some black up for the bow. The skull eyes were fondant as well. As soon as I finished the cake, I took a picture with my phone and sent it to the mom. I got an immediate reply of, "That is AWESOME!!!" She said it took a moment for it to register that I added the Monster High skull on there and it wasn't an amp or something like that.

The mom brought the cake to her daughter at her father's house (is this getting confusing?). The girl absolutely loved it and immediately laid claim to the skull portion. The report was that she wouldn't take her eyes off of the cake, even when her Mom was leaving and she had to say goodbye. That was exactly the type of reaction I was looking for with the design I came up with since it was based on everything I knew the girl liked.

Monday, August 22, 2011

A Saintly Groom's Cake

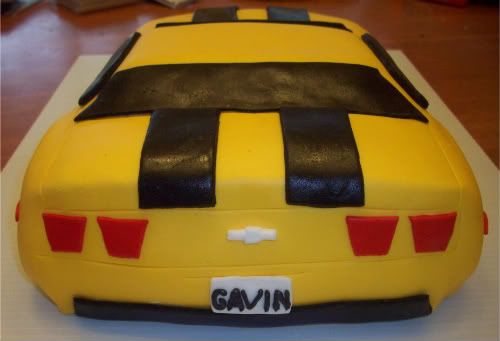
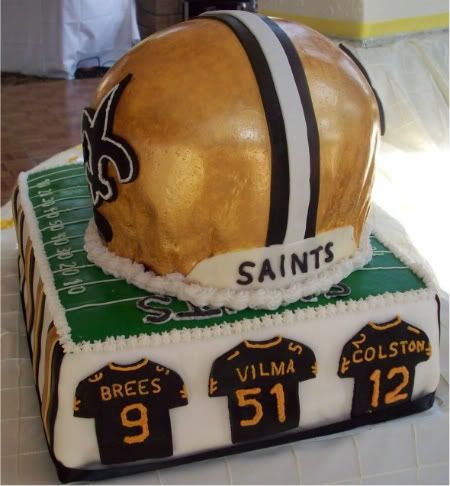
Everything on this cake is edible except for the face mask...

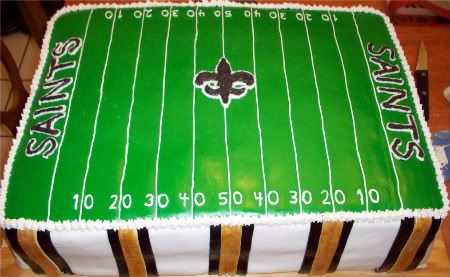
My son's teacher last year heard that I did cakes and wondered if I could do either her wedding cake of groom's cake. I said that I'd certainly be willing to entertain the idea, depending on what she wanted. We talked a bit over the weeks and I knew that she and her husband to be were both Aggies. The country club where they were having their reception was providing the bride's cake. Naturally, I thought that a Kyle Field cake would be awesome for the groom's cake and fun to make as well. The groom wasn't going for it. I invited them to come over and try a couple of my cakes and icings to see what they would prefer. I made two different chocolate cakes. One was my go-to cake recipe (or was) and I found a new one that sounded interesting because it had LOADS of chocolate in it. After I made that second cake, I had a new go-to recipe. That stuff is decadent. So that they could try the different icings, I covered half of the cakes with butter cream, and the other half with chocolate butter cream. I then made some fondant and covered a small area with it so that they could try that as well. Since I still didn't know what the design would need to be, I wanted to cover all of my bases. They loved the same cake that I did, and liked all of the icings. The groom did his research and pieced together a cake idea to run by me. He wanted the base to be the New Orleans Saints football field, with black and gold stripes on the long sides and team uniforms on the small sides. I had him give me a list of favorite players for the jerseys, and he came up with the idea of putting current players on one end and previous players on the other. Already, this thing was going to be elaborate. To pile on, he wanted a Saints helmet on the top. We talked a bit about the details, because I wanted to work on background colors since white jerseys won't show up well on a white background if I were to use that on the sides, which I did. We figured I could use the black jerseys on the sides and they would look great. Now, I don't know if they were worried when they left my place about how the cake was going to turn out, but I was bound and determined to make it as awesome as possible. It was their wedding after all, and it needed to be perfect. We decided that making a face mask out of sugar paste just wasn't worth the effort, so I told them I would get a real face mask to put on the helmet. They offered to get it, but I told them they had too many other things to worry about and that I'd find one. We also decided that the helmet would be chocolate cake with chocolate butter cream icing, and the base would be chocolate cake with regular butter cream icing so that they could have both on the cake and people would have options. Remember that point, because that idea got completely ruined later.

I did find a face mask that wasn't too expensive and got it in plenty of time for the wedding. I looked at the mask and gawked at just how large the thing was. I started to worry a bit, because that helmet was going to be heavy once I made enough cake to get a shape that large. I came up with solutions, but more on that later.

The week of the wedding, I started baking cakes on Wednesday night. The wedding was Saturday afternoon and I had to deliver the cake by 2:00 PM. The base of the cake was essentially two 12" x 18" cakes stacked on top of one another. Each layer uses three full recipes of the cake batter. They wanted to feed a crowd of around 250 people from what I can remember, so I wanted to make it pretty substantial. I figured out that the helmet needed to use 10" rounds to get the circumference right and that it would probably take around 4 layers for the helmet to be tall enough. Each 10" round is another full recipe of cake batter. All together, it was the equivalent of almost 10 of your standard two-layer round cakes, with even more icing than normal. I continued cooking through Thursday night, and started icing cakes that night as well.

I was taking Friday off to go meet my kids' teachers at their respective schools, so I had about half the day and all night to work on the cake. I stayed up until 1:30 AM on Friday working on the cake and around 12:30 AM on Saturday. I got up early each morning and continued working. I have no idea how many total hours I worked on this, but I estimate is had to be somewhere around 30, including all of the baking. Thursday night, I stacked the helmet, carved it, iced it, and covered it with yellow marshmallow fondant. I figured I would make the fondant yellow since I was going to paint the helmet with edible gold paint. If some of the yellow showed through, it wouldn't be too obvious. Also, since the helmet was 4 layers (3 1/2, once hand carved into the right shape), I put a plastic cake board on top of the second layer, supported by drinking straws through the bottom two layers to another plastic cake board. You wouldn't think straws could hold that much weight, but once you push a half dozen straws through cake to a hard surface, and cut the straws to about a 4" length, they're pretty strong and supportive. It happened to work out that the top of the second layer was just the right height to make the "overhang" for the front of the helmet. By cutting the cake board so that it was an oblong shape, I was able to carve cake around it, and had it stick out the side over the second layer, allowing me to defy gravity and have cake hanging over thin air. That night, I also covered the football field base with a crumb coat of icing before going to bed in order to keep the cake moist.

The next day, I started working on the football field again. That took a large portion of the day. I started with the idea of just putting icing on the base, but with that much cake and weight, I was seriously worried about cracking from movement of the spongy layers. The cake was sitting on a plastic cake board exactly the size of the cakes sitting on it. I didn't really want any lip showing so that it would look good and clean. However, this plastic board is not nearly rigid enough to keep the cake from flexing and cracking. The answer was to cut a piece of plywood to put under the cake board for transport. To make sure the cake wouldn't shift, I put nails on three sides of the plywood, and on the fourth side, drilled holes so I could insert nails to keep the cake board relatively stationary. It worked out great. It provided the stability I needed for transport. Even with that, based on the thickness of the cake, I was still worried about movement and settling, so I decided to cover the cake base with fondant to provide more structural stability. That did the trick. Once the fondant cooled and had time to dry a bit, the base was structurally sound and would survive quite a bit of abuse. There is a reason that the professionals on TV use a lot of fondant. If you're going to have to transport a large cake, fondant is the way to go. That, or refrigeration if you're using other icings. I put a layer of white fondant over the cake, then covered that with the green football field surface on top. The stripes and jerseys were additional fondant applications, with butter cream piped on for the details. The gold stipes started white, and I painted them with gold glaze and dusted them with gold luster dust to make them look just like the helmet.

Photobucket

While I was putting the details on the base, I "painted" the helmet. Covering that much surface area with an edible gold glaze takes a while. I found a gold glaze on a baking website. I also bought gold luster powder, figuring one or the other would work. I had tested them the week before to make sure I could get a good looking gold finish from them. The flat sample I used looked great! The glaze doesn't cover completely, and you can see some of hte brush strokes, but once you put the gold dust over it, it covers some of the imperfections and makes it look much better. The interesting thing is that the "solvent" used to keep the glaze suspended in liquid appears to have either a spearming or wintergreen oil in it. The sample I did had a faint minty taste to it. Not enough to de distracting if you're eating a bunch of cake, but noticeable when I only tasted the fondant coated with it. I had a stressful period of time where I got really worried about running out of the glaze before covering the whole helmet. It worked out though, and I was able to touch up any areas that were a little too thin before running out completely. After putting on the glaze, I then dusted the whole helmet with the gold powder. This gave it a great shine, and also helped mask and blend the brush strokes from the glaze. The finish wasn't perfect, but it looked about as good as I was going to be able to make it. It had sort of a weathered look to it instead of being perfect. By the way, Crayola paint brushes are garbage and fall apart on you. I wouldn't even give thost to my kids for art projects after trying to use some for this. They were brand new and steadily came apart on my. After fighting with those for a while, I pulled out a good brush that I picked up with which I had no issues at all. By the time I went to bed Friday night/Saturday morning, all I had left to do were the logos for the sides of the helmet and the jerseys for the sides of the base. I figured that wouldn't be too much work for a Saturday morning completion.

Photobucket

On Saturday, I was moving pretty slow in the morning. I usually get up pretty early for work and go to bed reasonably early. The late nights were taking their toll. After a shot of caffeine and breakfast, I set to work around 9:00. I completed the logos and the jerseys, then set about putting together my damage recovery kit. It was about 1:00 at this point. You're not going to transport something this large and detailed without damaging something. I grabbed everything I could think of to be able to perform assembly (helmet on the base) and possible repairs of icing on-site at the country club where the reception was to be held. I almost forgot to put the straws in the base to hold the helmet up, but I was bringing the straws with me, so it wouldn't have been a huge issue.

Photobucket

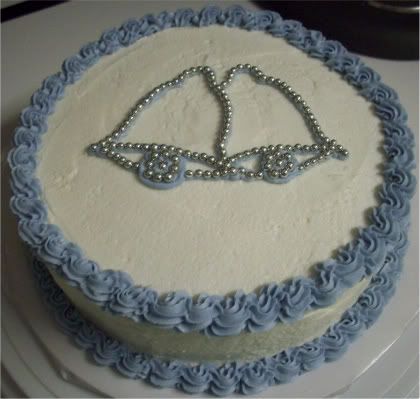
We drive to the reception site with the helmet in my lap. I was worried about it possibly tipping over, so I wanted to be able to cradle it. We made it to the site without issue. I carried the helmet cake down a long hallway to where the tables were set up for the cakes. Looking around, we saw a door right next to the tables that would make it far easier to bring in the heavier base. The coordinator told us we could drive around and use those doors, so we did. I didn't relish carrying that base which probably weighed around 30 pounds for a hundred yards or more. While we were moving the car, the DJ happened to spread out some of his things on the dance floor right in front of the door we were coming in. When I walked in the side door, I couldn't see the floor at my feet and I stepped in a speaker cover on the floor, which caused me to trip. As I saw the week's work flash before my eyes, I managed to get my foot out in front of me somehow to stop the fall. Also, the DJ was close enough that he lunged and got a hand on my chest to steady me. Good thing too, because I was falling with my cake towards the bride's cake. I potentially would have taken out both of them in one shot. I set my cake down in it's place and rested for a few minutes to stop shaking from the near tragedy. My cake board worked out great. I pulled the couple of nails and slid the cake off of the plywood board easily since the plastic cake board has a really smooth surface. I wrapped a black ribbon around the bottom of the cake to provide a nice clean edge and ensure that none of the plastic board would show. I didn't really want to pipe anything around hte base of the cake, and this was a nice, clean solution to dress it up. I then stacked the helmet on top of the field and set about making minor repairs. The S on the back of the helmet partially came off and I had to straighten some of the field lines. Some of the white around the logo had to be fixed as well from where my hands touched it as I placed the helmet down. After that, I piped the white around the base of the helmet and put on the face mask. The workers in the reception hall were impressed and I talked with a few of them while I finished setting up.

Photobucket

I had just enough time to get home, change clothes, and get back up there for the reception with my family. I was in decompression mode at this point. I had a lot of tension ensuring that everything got there without incident and looked exactly like what the groom wanted. I wanted to be happy with it as well, which I was. I was rewarded throughout the evening by the bride and groom coming over and thanking me for doing a great job. Her mother, father, and grandmother also all came over to my table to thank me individually. The bride was spreading the word throughout the evening because I had people that I didn't even know asking me about it and paying their compliments. That, of course, is a large reason for why I do this. Besides having the artistic outlet in food form, I love getting the compliments and having others appreciate my work. Top that off with a great meal, great wine and great company, and I had wonderful time.

I watched as the bride and groom cut the cakes. When they cut mine, the bride sought me out in the crowd and gave me a thumbs up, which was another one of those warm fuzzy moments. I then watched as the staff cut the cake to hand out. Instead of asking people which they would prefer, they simply cut a piece of each and put it on every plate. Interesting way to do that. I'm glad I made the cake as big as I did, because they'd probably need it. I also watched the staff take the small top of the bride's cake and put it in a box to save, as per tradition. However, they also took the ENTIRE helmet and did the same. Of course, their little boxes that they had wouldn't possibly hold a cake segment that large. Again, that was 3 1/2 standard 2-layer cakes worth of cake in there. This part actually bothered me a bit, because I happen to love the chocolate butter cream icing and nobody would get to try it if the entire helmet were removed from the equation. That's what happened though. I'm hoping that the family would enjoy some of it later, because there was just so much that the staff was putting away that nobody would want to put that much in a freezer for a whole year. Maybe I'll find out when the bride and groom get back from their trip. I hope that someone gets to eat all of the cake that didn't get shared. It would take the bride and groom a year just to eat all of that themselves.

Contrats to Jeremy and Katy! It was an amazing and beautiful event, and I wish them all the best in their new life togehter.

Beyblade

Photobucket
A friend of mine asked me to make a Beyblade cake. It started just like that, with no other details. I started offering up ideas, which pretty much all got shot down. Finally, her son asked for Burn Fireblaze. I did what anyone else who has no clue about Beyblade toys would do, I hit the internet. If you want to see what the toy looks like, go ahead and do the same. I'm reluctant to put a picture on here for copyright purposes. Now, for those who don't know (like me), these are essentially small spinning tops with designs on top to differentiate them from one another. The purpose is to spin them in an arena and let them fight until one falls down. It's actually pretty fun to play, because we played it extensively at the party. I had the typical problem trying to turn something extremely complex into a cake design. The toy in question has clear orange plastic, metal sides, yellow and black paint, and has holes where you can see clear through it. Not conducive to a cake design. I did the best job I could with the design to try and mimic the toy. The toy also has fins on the sides, which I was able to partially replicate with the cake and fondant covering by putting extra icing in places to make the fins stick out a little. I tried making gray fondant to cover it, and it turned out purple at first because the black dye that I had was essentially a really dark purple. I was out of the super black dye that I prefer, so I had to use what was on hand since it had to be done the same day that I was covering it. I recovered from the purple by brushing the outside with additional black dye dissolved in ever clear. This makes a pretty good glaze, which I painted over the purple fondant. Then I took some pearl dust and dusted the whole think. Once that was done, it looked more like a polished metal than the awful purple that it was before. The top design was cut out freehand from looking at the picture. The cake was vanilla, and there was butter cream icing under the fondant. The birthday boy loved the cake design and said it was delicious. What more could I ask for.

Tuesday, July 12, 2011

Caketastrophe

Over the years, I've had a couple of cake mishaps. One was because I put the cake in a cake carrier as soon as I finished it without letting it crust over and then delivered it to work the next morning (an hour drive). The border on the top of the cake started falling off. The girl I made it for (one of my best customers) took it in stride and ate the thing anyway. She's a cake nut, so the appearance wasn't a huge issue to her. There was another one where someone requested that I put sliced strawberries in the middle of the cake layers. I liked this idea, but as an experiment, it needed some refining. Strawberries weep, and in the presence of sugar, they weep a lot. Even though I put a good layer of icing between the strawberries and the edge of the cake, they started weeping out the side in places. There were also berries on top that I thought I could contain with a thick border of icing on the top. They pulled out so much juice that they started flooding over the sides. Live and learn. In fact, I need to try that one again.

This time, I think I made several mistakes. It happens to the best of us. This cake was to be one of the easier ones I've done in quite some time. A simple white cake with white icing and a few letters on top. No problem.

I got the request on Thursday to do a cake Thursday night so a friend could give it to his son on Saturday. Since I would only see them at work, I had to do the cake Thursday night so I could deliver it Friday. No problem...

First mistake was that I changed the way that I greased the cake pans so the cake wouldn't stick. The classic way is to use shortening and put a thin layer all over the pan. Follow that up with a dusting of flour, tap out the pan and viola, non-stick. I recently looked at a Cake Doctor book which recommended just using non-stick cooking spray on the pan and then following that up with flour. It works well, but caused some problems. Now, I used this technique on the X-Box 360 cake the week before and it worked great. However, that cake was iced and covered with fondant. It also didn't have to travel. When you use this technique, you end up with a little more flour on the outside surface of the cake. Maybe you can brush some of it off, but it still makes a rather dusty surface. This was the start of my problem.

Next, I put just a little more water in the icing than I usually do because I wanted it a little softer for spreading. I'm not sure this was a major issue, because wetter icing should stick better and moisten the surface. However, it doesn't firm up as much and takes longer to dry out or crust over. I had a heck of a time putting the top border on the cake. The bottom one wasn't an issue, but the top one gave me grief. At first, I chalked it up to being out of practice since I haven't been doing a lot of cakes lately. After being upset with the result a third time, I started thinking that it wasn't my technique and that the icing was a little thinner than normal. I was exceedingly careful the fourth time I put the top border on to make sure that nothing leaned over the sides. The problem was that the thinner icing would pull on anything leaning over the side of the cake and start to droop, so I made sure that wouldn't happen. I finally got it right and left it to dry.

Third problem, and the one I should know better. Since it was a friend and I didn't have time to go get a cake box, I used a cake carrier. Now, I did let the cake sit out for a couple of hours before putting the top on, but it apparently wasn't enough. The problem with a cake carrier is that they are air tight. It doesn't let the moisture out and allow the icing to firm up well. The moisture inside the carrier will soften the icing. I thought that I had let it dry out enough that it wouldn't be a problem. Not so.
Photobucket
The icing fell off of one whole side of the cake. I started getting a sick feeling when I looked over at it about half way to work. When I got to the office, I kept looking at it as I tooled around the office before I figured out what I could do. I managed to use the icing that fell off to fix the cake and make it presentable. I suspect that the icing fell off because of the dusty outside of the cake's surface, but that didn't really matter to me at that point. I used a plastic knife (not the best cake decorating tool) to pull up and smooth over the icing from the sides. Since I didn't have a piping bag handy, the top border had to go. The result was presentable, but not very pretty to me.
Photobucket
I told my friend what happened and not to worry about paying me for it, or he could take me to lunch since it wasn't up to par with my normal work. He paid me anyway, darn it.

In case you are wondering what it on top of the cake, it stands for lean six sigma. It's a process of continuous quality improvement that some companies use. I've working at companies which have completely ruined six sigma processes, so I'm not a terribly big fan. My friend's son had landed a job as a quality engineer recently, and this was to celebrate that new job.

You would think that the story is finished there. Nope. Devil cake wasn't done yet. I let the cake sit out all day to make sure that the icing would dry out completely an there wouldn't be any more issues. I even told him to do the same the following day prior to taking it to wherever they were going to celebrate. He took the cake and put it in the car for his drive home (also over an hour). Our Texas summers are hot, very hot. The car was warm, and he put it on the floor. The heat softened the icing and it started to fall off again! He said he was able to fix it well enough when he got home and they finished the whole thing off over the weekend. The top never had an issue, only the sides. Maybe it was the heat, maybe it wasn't, but that cake as nothing but ptoblems from start to finish. Sadly, it was one of the easier ones that I've done in quite some time. In fact, this cake was so boring that I wasn't even going to take pictures of it or write about it. Maybe the cake took offense to that and decided to get even...

Sunday, July 3, 2011

X-Box 360

I received a call from a friend and neighbor asking if I could do a cake for the weekend coming up. It was already Tuesday, but I had already planned on taking Friday off to go see Transformers 3 with my son, so I figured I could whip up a cake for Saturday. She said that the daughter of her mother's friend (follow that one?) made a cake that looked like an X-Box 360, but when she say the preview picture of the finished cake, she just couldn't give it to him. I told her I could do one for her. She brought over pictures as examples of what she wanted and a picture of the cake that was not to see the light of day. She was right, it looked really bad. Here is the picture:
Not Mine! Ugly version of Xbox cake
The picture isn't the best quality because it is a scanned copy of a printed version of the picture. That's ok, the cake isn't of very good quality either. Can you imagine someone charging $100 for that? I assured her that I could do one that would make her proud to give it to him. She wanted the black X-Box 360, which I informed her could be a problem. Too much dye could really wreck the flavor of a cake. The agreed that the white would be ok, but my wife convinced me to at least try the black to see if it was bad before giving up on it. I decided I would make chocolate marshmallow fondant and then dye that to see if I could get black a little easier. It worked out very well. The fondant tasted fine. They wanted a chocolate cake with chocolate icing underneath. I had happened to make a couple of cakes earlier in the week to let a bride and groom try them for a groom's cake I plan to do later in the summer. I tried a new chocolate cake recipe that turned out excellent. The chocolate icing is decadent, because it is made with butter, cream, and lots of cocoa. Evil stuff.
I hopped on-line and found a picture of the newer X-Box and controller, since she wanted the controller as well. I started the cake in the early afternoon on Friday and worked through the evening. I did the finishing touches the next morning. Some of the details don't show up since they are carved into the black face of the cake. They're invisible unless you're in person and the light is hitting it just so. I did have to mix up a little butter cream icing to use as "glue" for some of the components and for the green power indicator. I added the vent holes and other parts that I could see in the pictures of the real unit I found. I should have probably walked down the street and looked at the real unit for more detail, but I figured the pictures were enough.
Photobucket
The cake was a hit at the party. The birthday boy loved it. A few of the more amusing moments are when people would try to push it out of the way to set something down because they thought it was a real unit, only to be shocked when they really looked at it and realized it wasn't a real unit. One of the kids tried to grab the controller because he wanted to go play the real X-Box and nobody would let him. When his fingers sunk into the icing, he figured out real quick that it wasn't real. I wouldn't say it was totally life-like, but it was fairly close. Close enough to fool people if they weren't paying close attention. Success.
This one wasn't without its challenges though. I realized that adding that much dye to the marshmallow fondant dried it out considerably. I would have thought the opposite. When I was kneading the fondant, I kept adding more and more water to make it more pliable and less likely to crack. I finally got it rolled out nice and smooth and thought that it was soft enough to put on the cake. It was still a little dry, so there were some small cracks at the corners after it was put on the cake. Nothing catastrophic, but it still bothered me. She I did the controller, I tried adding a little shortening to the mix, and that did the trick. The fondant was much easier to work with then. I'll remember that for the future. I had some white fondant left over from the bride and groom earlier in the week that I tinted to make everything that wasn't black. Luckily, I kept the extra fondant, because it came in handy later in the week for this one.

Murder Mystery

If you have never had or been to a birthday party with a themed activity, I highly recommend it. It's a good time. I was invited to a murder mystery party with a wetern theme. The murder was to take place during a poker tournament. I was asked to make the cake for the party, with little guidance on what to put on it. What you see below is what I came up with.
Photobucket
The wanted poster, playing cards, and poker chips are fondant. The rest is white icing, tinted to whatever color I needed. Several ideas came to mind. One was the 5 aces, indicating that someone was murdered because they were cheating. The poker chips were obvious, and I wanted a wanted poster with a silhouette of someone with a cowboy hat. The border of the cake was meant to look a little like rope. I had another idea of taking the rope and bringing it into the center of the cake and framing the bad guy's face with a noose, but I thought that would be too busy. Another idea that one of my friends offered to me was to do a clue board. I almost went with that idea and made the rooms into the old west buldings, and maybe put a gun, knife and noose on the cake. I decided I liked the wanted poster idea better, so went with it. I did keep the knife idea though, as you can see from the picture below. The first picture above was how the cake looked when I left the house. When I got to the party, I inserted the knife into the picture. The knife was a tongue depressor covered in fondant. A little gel food coloring completed the blood splatter effect. I didn't want the knife falling over on the car ride over, so I waited until I got there to indert it. The cake was a hit at the party.
Photobucket

Cross

This cake was requested by the lady who received the Clarinda birthday cake. Oh wait, that would be Clarinda. She has a bible study group and they wanted a cross cake for their evening group to eat during their meeting. They had definite ideas about what they wanted on the cake, which I usually like. I offered up some decorating ideas to make it look more impressive. They wanted the glitter and wording on top, along with the scalloped border and the beads on the top. I offered to put lace on the sides, but as I started decorating the cake, I thought that would make it look a little gaudy, so I left that part off. I thought it turned out pretty well without it. To get the wording to cross in the middle, I had to slant the words a little. It worked out, but in retrospect, I should have slanted the "Lords" from low to high so it wouldn't look like it was coming down from the "King" on the top part of the cross. Oh well. They liked it, and that's all that really mattters.
Photobucket

Birthday (Fab-like)

I never thought I would get so much play out of such a simple design. I didn't even come up with the original idea, but people sure have requested this one a lot. This cake was for a birthday. Can you guess what the birthday girl's name was? The pink is still the marshmallow fondant, and the cake and icing are both the wedding cake recipe with a hint of almond. This time, the fondant turned out perfect. There are times when you make it where it is too dry or too hard, but this one rolled out and came out perfect. Each of the silver edible beads is put on with a pair of tweezers for these cakes. It takes a little while, but I like the effect.
Photobucket

Mini Fab cake

Here is another one of the "Fab" cakes. I got a kick out of this one though. A co-worker wanted a smaller version of the Fab cake so she could take it with her on a plane to New York City to visit her daughter. The cake was a six inch cake, that came to just under eight inches once all decorated. I found her a small box to carry it in as well. She said it made it to New York without any damage and they had a little champagne party with it. I just thought it was funny that she was taking a Sex in the City cake from Houston to New York.
Photobucket

Jello Shots!

My wife found an Instructable that took fruit and made jello shots using the rind instead of those little plastic cups. She posted the picture she found on Facebook and my brother told her that he wanted them for his daughter's graduation party. Mind you, it was his high school daughter's graduation party. However, the event was mostly for the family and friends, so there were to be mostly adults at the event.
Photobucket
Looking at the above picture, we had several different types of shots available. They are:
Strawberries filled with strawberry jello with creme de banana liquer (Awesome!)
Orange rinds with orange jello and orange rum
Lemon rind with lemon jello and Absolut Citron vodka
Lime rind with lime jello and tequilla(funny story behind this one)
Cucumber slices with watermelon jello and Absolut Currant vodka

The orange, lemon, and strawberries were my favorites. The strawberries disappeared first. To make the citrus ones, you have to cut the fruit in half, clean out the flesh and fill the little bowls with the jello mixture. Once they set up, I turned them over and used an electric knife to cut them into wedges. I tried other knives first, but they didn't cut well enough. The electric knife cut through them like butter. We used the flesh from the lemons and limes in smoothies, to there was no waste. Same for the strawberries. The lime flesh got tossed, because I don't have much use for lime. I don't recommend the limes because they are such a royal pain to clean out. It just isn't worth the effort. As for the limes, I wanted to make margarita-type jello shots. Combing through the liquor cabinet, we didn't have any tequilla. I called a neighbor who I figured would have some and said that I was making a recipe and that I needed to borrow a cup of tequilla. Believe it or not, I don't think they thought I was serious. Once I didn't break out into some sort of joke, they realized I was serious and that I realy did want tequilla. In return, I gave them a couple of each type of shot to try. I think it was a fair trade.
Photobucket
The cucumbers were fairly easy. I peeled the cucumbers and scooped out the seeds. I then filled the little boats with the jello mixture and let it set. After that, I sliced them and they looked like little watermelon halves.
The strawberries were fairly challenging. It's tough to scoop them out and not pierce the sides, but still allow enough room to provide enough jello to be of any use. You also have to slice a little bit off of the tip of the strawberry so it will sit up straight. If you do that, many of them are fairly hollow, so you'll have a hole in the bottom. If that happens, all of the jello will leak out. We found that out the hard way. I took some of the strawberry debris from cleaning them out and stuffed it in the bottom to plug the hole. That worked well enough. Another idea is to dip the bottom of the strawberry in chocolate before filling them with jello. Mmmm...

PFGT Summer Camp Expo

I am a board member for the Humble Parents for Gifted and Talented (PFGT) organization. At the time of this event, I was just an active memnber of the organization. One of the big activities we offer each year is the summer camp expo where local businesses and schools come together to present activities for kids to do during the summer. I volunteered to make thank you packages for each of the people volunteering their time to come and present their activities at the expo. I decided to put several things into a bag. I wanted to do a cupcake, but the problem with that is transport. What I found was a mug gift box at the local party store. It was a little larger than I needed, but I put a piece of tissue paper in the bottom of the box to stabilize the cupcake and help fill the box.

Photobucket

A little edible glitter on the top of the cupcake, and it was a nice little surprise when you opened the box. The cupcake was my white wedding cake recipe with white icing.


Photobucket
Next were some greek cookies that I made from my grandmother's recipe. I've been eating these as long as I can remember. They're like a shortbread cookie with cinnamon rolled into layers. I make mine into many thin layers instead of just a few thick layers like the recipe suggests. I like the extra cinnamon and the texture more. They are similar to biscotti, but won't break your teeth. One recipe of the cookies was more than enough for all of the attendees to get about a half dozen cookies.
Photobucket
The above image is of my oatmeal cranberry cookies. These are another one of my favorites. The family loves them, so when I make them, they go quickly. I made several batches for this event so each person could get several cookies.
Photobucket
This picture was the top view of the cookies and cupcake box in the gift bags. Tissue paper was put over the top of it all to finish it off and make it more presentable.
Photobucket
Here are all of the bags filled and ready to go. There were 24 bags in all. I didn't keep a close tally of the expense, because this was my addition to the event and I didn't ask for payment. I think the cost probably came to around $100. Not too bad considering there were 24 bags full of goodies.

Monday, February 28, 2011

"Camaro SS10"


Ok, so my son is a car nut. I knew he would want a car for his birthday cake, so we asked what kind of car he wanted. "Camaro SS10" was the answer. Not being a car nut, I had to look it up. I quickly realized that it was the same car as Bumblebee from the Transformers movie. My wife then asked what color he wanted before I could stop her. The reason being that I didn't want to have to do a red car. Getting red over that large of an area would be a pain. I could do it, but really didn't want to. Of course he immediately said, "red." I had to tell him no. We then settled on yellow and black. That was good, because I could find plenty of pictures of that! That's a car I could work with. The cake itself is a vanilla cake, not white. Good flavor. I put butter cream icing between the layers and covered the cake with it to make the fondant stick. It started as two layers that I baked in casserole dishes this time instead of cake pans. The size was about right, so I figured it would work out. This is the first time I've done a car in fondant. It's only the second time I've done a car, so hey, I figure I'm doing ok. The outside is the marshmallow fondant of course, with a few icing highlights. From start to finish, this took about 5 1/2 hours. That's from the time I started mixing up the batter until putting on the last detail. I'm going to start paying more attention to the time it takes, but because I'm curious how long some of the more elaborate ones take.


<

Photobucket


Sunday, February 6, 2011

"Ugly Little Spud"

My son wanted Slimer for his birthday cake this year. I've always been a Ghostbusters fan, and my son became a huge fan after watching the movies and then getting the video game (which is awesome on the PS3 by the way). I found a few pictures of slimer to work from. This one is a fairly close rendition of the picture I liked the best. The problem is that slimer is a ghost, so you can see through him. Try and turn that into an opaque cake made of icing. I'll admit that I struggled with planning this one. Until I started carving the cake, the design wasn't exactly set. I looked at the picture and started shaving. the folds of his belly are carved into the cake. His eyes and mouth are also carved in. Most of the other detail was made from building up the icing underneath the fondant to give it a little rise and texture. The cake was chocolate and below the marshmallow fondant is chocolate butter cream icing, my favorite. When I use fondant, I put a healthy layer of icing underneath so you can still enjoy the icing even if you hate the fondant.
After shaping the cake, icing it, and putting on the fondant, I pressed the fondant into the detailed areas for shape and accent. It was sort of like playing with a clay sculpture. The only thing was that if you push a little too much, you'll tear the fondant, and it's a very bad day. Luck was with me and I didn't do that. Once I had the fondant exactly how I wanted it, I rubbed the areas where I wanted darker shading with dark green pearl dust. The higher areas where I wanted highlights, I rubbed with white pearl dust. The green made it darker, and the white made it slightly lighter, but both make it shiny. The shine doesn't show as much in the picture, but it was a cool effect. Last, I piped the details on the face and around the base of the cake. Since the icing beneath was chocolate, it wouldn't do to have any chocolate peek out from beneath the green fondant layer. I was incredibly pleased with how this one turned out. It tasted great too. In fact, there was a boy at my son's party which doesn't like chocolate cake. We gave him a piece and he ended up scraping his plate clean. I call that a job well done. I usually have quite a bit of cake left over from my kids' parties, because I make them a bit bigger than necessary. A larger cake is sometimes easier to decorate for the things I often do. In this case, I was surprised at how much was eaten at the party. There was about 1/3 of the cake left for me to take up to the office the next day.

Gluten Free

This cake was my first foray into gluten free baking. A lady in my office is gluten free by necessity. Some of our co-workers were planning to get a cake to celebrate her marriage to another one of our office mates. There was great concern because nobody was sure where to get a gluten free cake from. I happened to walk up at that moment and offered to make the cake for them. They were greatly relieved. This was no small feat either, because we ended up having to go to my nephew's birthday party the day that I was planning to make this cake. I planned to make it from scratch. I bought all of the ingredients to make a gluten free flour mix to use in place of the flour and everything. I planned ahead though. As a precautionary measure, I bought a gluten free cake mix. It was a good thing I did. We didn't get home until late in the afternoon on Sunday, and I had to have the cake for Monday morning. I didn't want to take the chance on making the cake from scratch and messing it up. Since I have never made anything of the sort before, I didn't want to be up until midnight re-baking a cake so that it would be edible and presentable.
If you have never had gluten free baked goods, or don't know exactly what it's all about, I'll explain briefly. Gluten is the protein in wheat flour that binds things like bread together when you process the flour in combination with water. The yeast makes the bubbles in bread, but the gluten is the glue that holds the bread together and gives it the wonderful texture that I personally love. With gluten free baking, you don't have the flour, so you have to find substitutes for not only the flour, but also the "glue" to bind the mixtures together and give them form or texture. Different flours are used, such as potato and rice. For the binder, you have to use either guar gum, or xanthan gum. Most of this can be found in modern supermarkets in the health or gluten free areas. If not, they will be in pretty much any health food store, but will cost a little more there.
I have all of the ingredients to do some serious gluten free baking now, which I will experiment with, but as I stated before, the cake I made was a mix. It turned out pretty well. When it bakes, it rises to astronomical levels. It looked gorgeous when I took it out of the oven. I was so excited. Over the next 10-15 minutes, the cake deflated to something slightly thinner than a traditional baked cake layer. It looks different too. The outside has a slightly sticky or gummy texture to it. The inside isn't like that, only the outside, which is weird. It sure does help icing stick to it though. I didn't have to do a whole lot of leveling on the layers before I stacked them. I used my butter cream icing to cover the cake and put the edible silver candies on the bells. They wanted something simple since this was basically only going to be for one person. In fact, they only asked me to make something large enough for the one person who was going to eat it. I made the whole cake because I had the mix and it was just easier that way.
The cake was just ok when tried by itself. When covered with the icing, it was actually pretty good. I liked it better than the store bought cake that they got for the rest of the office to eat. So many people wanted to thy the gluten free cake that there wasn't much left, if any, for them to take home to the rest of their family. I was please how it turned out in the end, and the co-worker that I made it for thanked me repeatedly for making it for her. She'll be my guinea pig for future gluten free experiments, not that she'll mind.

Office Birthday

This one was a simple cake that I made for our admin. It was a white cake with buttercream icing. I wanted to do a different border than the typical scalopped piping, so I surrounded it with dots, then put colored dots on top of the white. Simple and elegant, but not too plain.

When Pumpkins Go Bad!

Halloween is big around our house. It ranks up there with Christmas as far as decorating goes. We're still working out what we want to to on the outside of our house for Halloween, but the inside gets decked out each year for Halloween. The above pumpkins were intended for our office pumpkin carving contest. However, I had a conflict and had to be out of the office on the day of the contest. It may have been a good thing though. The top pumpkin in the picture was really cool looking when I bought it. It was green with a little orange, and covered with warts. Over the week since I bought it, it turned more orange, which annoyed me greatly. It also did this weird thing where parts of it started to look like they were starting to rot. It was really spotty, and sort of added to the effect. The problem started when I began carving that ugly pumpkin. It looks really cool, but the skin on that thing was like hardwood. You simply couldn't carve the thing with a knife. It I had thought about it, I would have pulled out the power tools. I was wanting to just shave a little off the outside, but it couldn't be done. Normally, I would consider painting a pumpkin instead of carving it sacriledge, but it couldn't be helped here. My hands simply gave out from fighting the thing, so I bailed on finishing the carving and painted the rest. Not as impressive as I wanted, but entertaining.

Cheesecake for Thanksgiving

There was a benefit held at our office to raise money for a co-worker with cancer. I was asked if I could make something for the silent auction. They started by asking me to make a cake. I offered a better option. I submitted a coupon for a free baked item of their choice, with certain limits. The winner ended up asking for a strawberry cheesecake for Thanksgiving. This recipe baked up real nice, but I would probably double the amount of cheescake in this one. It ended up a little thin. It was a new recipe and I didn't take into account that my pan was slightly larger than the one the recipe called for. The guy who got it is pretty quiet, so I didn't ever get any feedback on it. I'll probably make it again, but I'll have to adjust the recipe.