Thursday, July 8, 2010

Post-wedding Cake


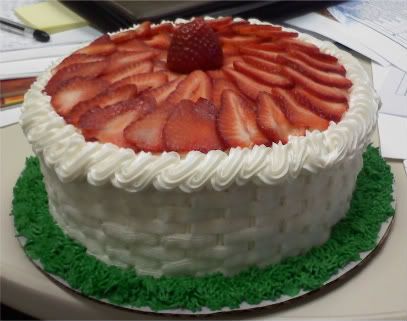
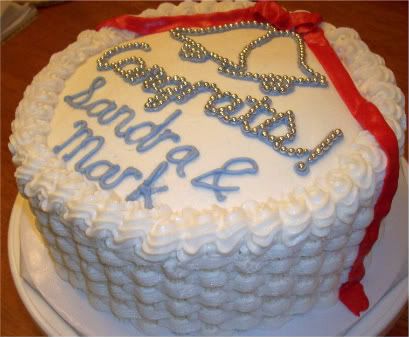
I came back from the holiday weekend thinking that it was strange that I didn't have any cake orders this week. I had been doing so many recently that it seemed like I had at least one a week. On Tuesday afternoon I get an e-mail asking me if I could put together a cake for a couple in the office who got married over the weekend. This was a quiet affair, but people in the office wanted to do something special for them. I came up with this simple cake to mark the occasion. Believe it or not, I still had some of the edible silver beads from the multiple cakes I've used them on. I put them on the bells and the "Congrats!" Even with the basket weave sides and sparkly top, I still didn't think that it looked finished enough, so I added the red ribbon. At that point, I was happy with it. I put strawberry filling in this one, by request.
Normally, I have cake boxes on hand for any cake I deliver. Boxes are great because they let the cake breathe just enough to crust over and firm up, but not so much that the icing gets hard. The cake is also protected from bugs or anything small that could accidentally fall on it, like all the rain we've had. Since this cake was last minute, I didn't have time to go get a box, and I was out of stock at home. I decided to use my cake carrier instead. Not a terribly bad idea, except that this cake was really moist, as was the crumb coat that I used on it. I let the cake set up for quite a while before putting it in the carrier to protect it overnight. In the back of my mind, I was worried a little bit about the moisture being closed up inside the carrier and softening the icing. I checked the icing before I left the house and it seemed fine. It wasn't. I brought it with me in the morning and when I opened it up at my destination, the ribbon had broken in a couple of places and I could see some of the white icing had shifted ever so slightly. The white icing wouldn't really be noticed by anyone but myself since you needed to see the perfect version as a comparison. The ribbon was a major problem though. With some nimble toothpick mastery, I was able to repair the ribbon to almost its original state. At least it was a solid ribbon again, though it lost some of its luster in the areas I had to repair. It looked fine in the end and everyone enjoyed it, especially the bride.

German's Chocolate Cake

Most people call this "German Chocolate Cake", but I think the real name is "German's Chocolate Cake" after the name of the chocolate. The recipe is still printed on their boxes and I believe it shouldn't be tampered with. There is an amusing story behind this one. This cake was done for the same lady who ordered the Diva cake. We always have fun discussions. She bought everything to make one of these cakes for her huspand's birthday, but never got around to making it. Two months later, she asked me to make it for her, so I gladly said I would. In retrospect, I should have asked her to just give me the ingredients she bought and I'd use them to save her some money. I didn't think about it at the time. The ingredient list for this thing isn't cheap. If you've never made this cake, it is pretty labor intensive. Decorating it is a snap, but getting to that point takes quite a while.

I got the cake mixed and in the oven before starting on the icing. Since even the icing has to cool, I wanted to get a jump on it. If you use the icing when it is too warm, it will just fall off the cake. Also, if you put it on the cake when it is too warm, it'll do the same. Now, the recipe says to cook the icing mixture until it gets to a light brown color. That was the only part of the recipe that I hated. It also says it will take 10-12 minutes to get there. Maybe their light brown is a little different than mine. I've cooked caramel sauces before, so I knew the color I wanted to go for and it takes a bit longer than 12 minutes to get there. I got the color and texture I wanted, knowing that it would set up more as it cooled, and set it aside. After everything was cool I iced the cake. The classic way of icing one of these is to put the icing on top and between the layers only. You leave the sides open to the bare cake. That's pretty and all, but I think it is a really bad idea if you are not going to eat the cake immediately. Also, you would have to pile the icing on about an inch thick in the areas you do have it if you wanted to use it all. Since this one was going to sit overnight and maybe longer, I decided to cover the entire outside with the icing. It keeps the cake moist, where the classic method will tend to let the cake dry out. I iced it and covered it up for transport the next morning.

The feedback I received on this one was excellent. She said her family will not often finish the cakes she makes for them, but they all had a piece of mine and each asked for a piece in their lunches the next day. Krystal, who I've mentioned before and is crazy for cakes, got a piece and gave me her two cents as well. She was really pleased with the icing because it was so think and gooey. I guess that little extra time I spent cooking the icing paid off. My wife also told me she loved the icing since she continuously sampled it while I was decorating the cake. She knows that I often have leftover icing from many of my cakes and spent time looking around the next morning to see if I had kept any of the icing from this cake. Unfortunately for her, I used it all. Well, at least all of it that we didn't eat before I put it on the cake.

Chocolate Cake Poppers


I'm still working on a name for these. Cake Balls doesn't sound good, so Cake Poppers will stick for now (Thanks Hugh). I mentioned the chocolate buttercream icing in an earlier post. Here's what I did to make these little gems. I had a lot of cake trimmings from the Toy Story cake. I made it extra thick since it needed to feed quite a few people. When you bake a cake, the cake always domes up on you in the middle, even if you use insulating strips on your pans. Since the cake was a half sheet and I used a LOT of mix in the pan, I had quite a large dome in the middle to cut off. I saved any trimmings I didn't eat (*grin*) and put them in a plastic bag until the weekend when I could get around to using it for this little experiment. I mixed up some of the chocolate buttercream with a bunch of cocoa to make it dark and I used heavy cream this time. OMG! I can't tell you how good that stuff was straight out of the bowl. I could clog my arteries eating the stuff but I would die a happy man. Once the icing was ready, I put all of the chocolate cake trimmings in the bowl and mixed it into the icing. The result was a decadent truffle-like mixture. Then I put the mixture in the fridge so that it woud firm up and I could work with it. When cool, I scooped out small amounts and rolled them into little balls. Once that was done, I put them in the freezer for a few hours to firm up. I melted some semi-sweet chocolate in a double boiler and dipped the frozen balls into the chocolate. They were then returned to the freezer to set up. The only thing I would say needs improvement is that the chocolate needs to be tempered or mixed to make the end result harder at room temperature. The chocolate was a little soft, and ended up being a little sticky with the humidity. They were delicious though. I took about a cookie sheet and a half worth of these to the office and they were gone in about an hour. People would try one, then leave with a small plate with three or four more. Not bad for leftovers!

Toy Story Birthday

I simply love the way this one turned out. This is the one that I practiced the buttercream transfer technique for when I did the graduation logos. This was done for another parent we know who learned that I did cakes. She wanted a half sheet Toy Story cake for her son's birthday. Since toy Story 3 was coming out around that time frame, finding pictures online was quite easy. I found a picture that I used a reference for the image above. I took a cookie sheet and covered it with plastic wrap. Then I started with the black icing with a very small tip and did all the outlines. Then I built up the colors one layer at a time until I had all of them. I'll admit that this one made me nervous. I did it early in the week so that I could do it again if I messed it up. Since it was so big and took so long to do, I didn't know until the next day what it would look like because it had to freeze and set up before I could turn it over to see it. I freaked because Woody's head popped off when I flipped it over, but it was an easy fix and no harm done. I tend get bothered by little details, and there were a few lines on the characters that I wasn't real happy with. I fixed some, but missed a coupld that I would have rather had on there. The cake was due Friday, so I baked the cake Thursday night and put on the basic icing. Then I simply laid on the image I piped earlier in the week and iced around it to integrate it in. After that, all that was needed was the piping around the edges and the lettering and it was done.

Diva!

One of the ladies at the office saw the Fab cake and wanted the same basic thing for her daughter's birthday, only larger. This is a half sheet covered with the pink marshmallow fondant. This time the fondant behaved for me. She wanted a microphone and "Diva" written on it instead of her daughter's name. I had some of the sparkly stuff left over, and I thought a little girl would simply love sparkles on her cake. I wrote out the lettering and added the silver beads to the Diva lettering and around the base. I then did the outline of the microphone in black and filled it in with the silver edible glitter and a few more of the silver beads for accent around the mic. She wanted the glitter just like the "Fab" cake, but I was out of the light weight clear glitter. Instead, I dusted the pink fondant with pearl dust. It gives is a real nice shine instead of the sparkle like the glitter gives you. It was taken to the daughter's school, and I'm told the kids and staff loved it. It's always painful not being there for the reveal, because that's one of the best parts of doing cakes for others. I really need to make a background to take pictures against. My kitchen table just isn't a very good backdrop.

Another Graduation

Krystal ordered another cake from me around the same time frame. This one was for her own graduation. That really shouldn't be allowed, but hey, I aim to please. She came up with the wording, but left the rest open. She bought all the sparkly stuff for the Fab cake, so I felt compelled to use more of it. The lettering was all done with the silver beads, placed individually again. Then I dusted the top with a whole bunch of the clear edible glitter to give it some shine. You can just barely make it out in the picture.

Sex In The City 2 Premiere


I will admit, I am not a fan of Sex In The City. I just never got into the show, so I never watched the movies either. My friend Krystal is all about it though. The asked me to make a cake for the premiere of Sex In The City 2. She's one of my biggest fans, so of course I said I'd do it. She wanted pink fondant with "Fab" written on it. The pictures above are what I ended up with. I had offered to do a shoe, or some other fashion accessory, but this is what she wanted. This started out normal enough, until I got to the fondant. As I've stated before, I use marshmallow fondant. Depending on the temperature, it can be a little stiff. One option is to add a teaspoon or two of corn syrup to make it more pliable. I did that. It took on the consistency of silly putty. It was actually hard to work with because any air bubbles popped out more than usual and it was really hard to remove them all since it was so soft. The weird thing is that I have made the same recipe since then and added the corn syrup without getting the same effect. Maybe the marshmallows were either an off brand or older or something. It tasted fine, but even she admitted that the texture was different because it was a bit more chewy. Not a complete failure, but not perfect either. She wanted it sparkly, so I told her to stop by the cake supply place in Houston and pick out whatever sparkly items she wanted to use. She found the edible silver beads, clear glitter, and silver glitter. I promised that I would use whatever she found. The silver beads were put on idividually with tweezers for the wording and all the way around the base. The top picture shows the cake after the glitter was put on top. The one below was before the glitter was added.

High School Graduation

I realized upon posting this that I have no idea what high school this logo is for. I asked for the logo and got the image to use as reference. The order was for a chocolate cake with chocolate icing. My kind of order. I love chocolate. I decided to try a chocolate buttercream recipe that I found. It is an interesting recipe since it has all sorts of options written into it. You can vary the amount of cocoa you use to make it darker and give it more flavor. You can also use anything from milk to heavy cream to change the texture and richness. In this case, I used milk and a whole lot of cocoa. This icing is excellent. Probably my favorite so far. I tried it again later with the cream and the reaction everyone had upon first trying it was that eyes rolling in the back of the head look. This recipe is a keeper. It even worked great for piping, which I was worried about. On this cake, the logo was a regular buttercream transfer I did earlier in the week. I was sad that I didn't get to try this one.

I had a little extra icing from this one, which I usuall throw out. In this case, I had to keep it. We're only talking about a 1/4 cup, but I couldn't bear throwing it away. I put it in a dish and stuck it in the fridge. It was gone by the weekend because my mother and I sat and ate if straight out of the dish after lunch on Saturday.

Clear Lake High School Graduation

Done for another co-worker for his daughter's graduation. Chocolate cake with white icing. That poses a bit of a challenge because the crumb coat becomes vitally important. That's where you put a thin layer of icing on and let it crust over before putting the final layer of icing on. The crumbs are so dark that you have to make sure the crumb coat gets it all or you will see the dark crumbs through the white. Not pretty. This and the one in the next post were experiments. It was the first time that I tried doing buttercream transfers. I learned about the transfer technique where you ice the image upside down on plastic wrap ahead of time, then freeze it. Whe you get ready to do the cake, you put icing on the cake as normal, then just pop the transfer into place and put icing around it to integrate. Doing this, you can do the image ahead of time as early as you wish. When I'm doing a cake on a weeknight, it saves a ton of time since the detail work is usually what takes the longest. In this case, I did the images on a Tuesday night for cakes due on Thursday and Friday. The images waited for me in containers in the freezer until I was ready for them. In this case, the eagle was the transfer that I did ahead of time. It can be a little worrisome because you are doing the image upside down and can't see the finished product until you've frozen it. My wife, who always thinks of the common sense solutions, suggested that I use a piece of glass for this so I can see my work during the process. I'll admit that the thought didn't cross my mind. I was using a plastic cutting board, which tends to be rather opaque. I did these as practice sessions for the more ambitious image I had planned later in the month.

University of Houston Graduation Cake

A little of the deatil for the logo is missed from this angle, but I wanted to get the side paw print in the picture. I was asked to do this one for a friend at the office for his son's U of H graduation. The logo was done free hand. After this, I learned of another technique that makes it much easier to do logos and images like this. More on that in a later post. I finished the top and had some leftover black icing. I decided to add the paw prints on all four sides for a little extra interest.

Strawberries for Mother's Day

I received a call from one of the ladies at my office who asked if I took orders. They had tried one of my cakes and wanted to order one for the ladies in her department to celebrate Mother's Day. Other than wanting a white cake with white icing, I got very little direction and was told to just use my imagination and make it pretty. You can see the result above. There are some logistical problems to a cake like this. I did the cake the evening before it was due, except for the strawberries. I sliced those on a mandolin and put them in a container in the fridge overnight. The reason is that if you put them on the cake, the juice from the strawberries will begin to melt the icing because the sugar will pull all the moisture out of the cut berries. I packed it up in the morning and took it in to the office. I got in early that morning so I could get it ready. As soon as I got there, I put the strawberries on paper towels to pull out as much of the moisture as I could. After maybe 30 minutes, I then put the strawberries on top, with the expectation that they would last at least a couple of hours before causing any mischief on the cake. It worked. I took the cake to the ladies and they loved it. It didn't last long enough for the icing to have any issues. The trick with this is to eat it within a few hours of putting the sliced berries on. If I had made some sort of thickened puree to go on top instead, it probably would have lasted quite a while. That wasn't the effect that I was going for though. I added the grass because the basket of berries looked like it needed to be on a field of fresh grass. It makes for a pretty presentation.

Sunday, July 4, 2010

Lego Brick


My digital camera really didn't like the red on red of the pictures. I did what I could to make the details stand out a bit.
My son decided he wanted a lego brick for his birthday cake. We also said he wanted it to be red. It just had to be red, didn't it? I so didn't feel like mixing up that much red icing. I could have used fondant to cover the cake and it would have been all smooth and I could have even made nice sharp angles. I didn't really want to make him another cake covered with fondant though. I can get reasonably sharp corners with regular icing when I have to. It just takes some patience. Usually, you see cakes with piping at the top because it is far easier to do that than it is to get a nice clean edge on the icing without it.
I happened to be at the store and saw that they sold buckets of red icing pre-mixed. I grabbed one and headed home. I made a half sheet cake and cut it in half. Then I stacked the halves on top of each other to make the main body of the brick. cupcakes were used to make the dots on top. Instead of the Lego logo on each of the dots, I put his name on some of them. It's a bit hard to make out since it is red on red. It turned out well enough. The problem was that red icing that I bought. It tasted weird. Even the kids at the party made comments about the taste of the red icing. Lesson learned, always make my own icing. After the party, I didn't even keep the remaining cake to take to work since I wasn't very pleased with the taste. I just tossed it. I haven't wasted my time buying fondant at the store either, but I imagine it's just as bad.

Saturday, July 3, 2010

Green Car


This was another one of those birthday cakes where I simply made what my son was interested in at the time. He likes cars, so I took one of the ones he played with quite a bit and made it into a cake. Now, I could have raised it up and put wheels on it, but decided to go easy on myself. I made a half sheet and cut off part of one side and made the top. I carved that pile into the rough car shape and then iced. The black wasn't as smooth as I would have liked because I didn't make it thin enough. It's not bad, but when I already had the black in the piping bag, I didn't want to take it back out to thin it again. I just dealt with it. All in all, it wasn't bad. You can see the car I based it on in the picture.

Sonic the Hedgehog

I've always been a fan of Sonic games. My son got turned on to them and liked them immediately. I decided to make him a Sonic cake for his birthday. For this one, I printed out a picture of Sonic in the size I wanted, then cut it out. I outlined the picture on the icing with a toothpick so I din't have to completely freehand it. I then set about freehanding the rest of the details. The picture was iced using dots of icing. It's the same idea as Pointelism, just on a cake and with icing. If you look closely at the picture, you can see the points of the dots mostly on the feet and face. I didn't mind the effect, so I didn't bother smoothing it out.

SpiderMan Cupcakes

My son was into Spider-Man at the time, so I decided to make him a Spider-Man cupcake "cake" for his birthday. I hate making red icing. It takes so much dye to make it and get a good color. In retrospect, I could have made the black suited Spider-man, but then it would have taken a ton of black, and that's not much better. To save on the red, I pushed all of the cupcakes together and frosted them with white to cover it all and get it sort of flat. Then I put the red on top of the white icing once it crusted over. I piped on the black lines and that was it. The main problem with the cupcake "cakes" is that it takes quite a bit of icing to get the cake effect and fill in the voids. Most people end up scraping off a good portion of the icing because there is just too much to eat unless you're a sugar fiend. We started with the idea of doing separate cupcakes and just buying the little Spider-Man cupcake toppers to stick in the top. I wasn't satisfied with that idea, so it evolved into this before I was happy. This was my first cupcake "cake", so it was an experiment too.

Bug Cupcakes

I made these for my youngest son to take to school for his birthday. I think the cupcakes were white, which I then covered with green frosting. I thought about using the hair icing tip again, but the problem with that is that all the little hairs tend to break off and make a mess. I didn't want to do that to his teachers. The bugs on top were made using melted semi-sweet chocolate squeezed out of a zip top bag with a small corner cut off. It would have been cleaner if I had used a parchment paper piping bag, but I was experimenting again. The bodies all contain M&Ms to some degree.

My Jack-o-lantern


My company was having a pumpkin carving competition. It was my first year there, but I decided to enter. This was the result. I got a large pumpkin and shaved almost the entire rind off of it using a microplane. It took quite a while. Then using a grapefruit spoon and paring knife, I carved the rest of the details. I think I used a regular spoon for the smoothing. I was thrilled with the result since I had never done a pumpkin this detailed and ambitious before. This took me a few hours to carve. Some of the depth and detail doesn't come out in the picture, but it's a pretty good representation. I won the contest, so it made it all worthwhile.

Halloween!

We simply love Halloween and the decorations that go with it. We had a Halloween party for the kids one year. Adults were there too, but it was mostly to invite the kids over and let them use their costumes for more than one night. Below are many of the items that we made for the party.

These are meringue bones. Easy to make, just like the cookies. In this case, I whipped them up and put them in a pastry bag. I piped them directly onto the cookie sheet in the bone shape and baked until firm. I love these, but don't make them very often.
We had this skull planter and figured it would make a good serving dish for dip. We mixed up some spinach dip that we use for many of our parties and added a drop or two of red food coloring. It looked sufficiently gross for my liking.

No Harry Potter fan should be without chocolate frogs. I found a great mold and made these out of a mixture of semi-sweet and milk chocolate. I made some plain, and some crunchy. I couldn't help but make some crunchy ones. I used rice crispies for the crunch factor. Another idea I had was to use pretzels broken into pieces and lay them out like the frog's bones. That would have added to the ick factor, but taken a little longer.

Bread stick fingers. I will probably try to make them a little thinner next time, but they looked OK. The nails are simply almonds that you press into the end of the breadstick before baking. You can also used blanched or sliced almonds, but I wanted this look.


Jack-o-lantern cupcakes. Each one is different. I think they were chocolate and I wanted to make each one unique. The kids liked them.

I carved this pumpkin and we mixed up some guacamole dips for it to spew forth. I was quite pleased with the effect.

Gummy worms. I simply love these. They are made from Jello with a little bit of cream or milk mixed in. You make the Jello and then pour in the cream. If you place the mix in a tall container, you can then put in bendy straws and then put in the fridge to set. The reason you use the bendy straws is that the bendy part will give the worms their signature ridge segment. You can use pretty much any red Jello. I think I used black cherry and added a couple of drops of green food coloring to give them more of a brown hue. Once they're set, you simply squeeze one end of the straw and slide your fingers down the length of the straw. Easy and fun.

Friday, July 2, 2010

Lego Indiana Jones


Again, my son selected what he wanted for his birthday cake. This year it was Lego Indiana Jones. My first thought was to make the Lego Indy character by carving a half sheet into his shape. It wouldn't have been too hard. Instead, since we bought him a couple of the small Lego Indiana Jones toys sets, I decided to use them on the cake. The cake is a half sheet, and tow layers. That's a lot of cake. We had plenty left over for me to bring to work after the party. Because this one was pretty heavy, I ended up putting it on the back of a cookie sheet.
I covered the cake with green fondant, then made the road out of brown fondant. I put the toys on top and took a hard look at it. It was a little too plain. I mixed up some buttercream and made the vines and leaves on the sides to add some interest to the sides. It helped a lot.


Transformers, Take 2: Bumblebee!

My son wanted a Transformers cake for his birthday. I already used the Transformers logo idea, so I had to come up with something different. We settled on Bumblebee. To keep it easy, I decided to do him with his face shields in place. I used marshmallow fondant on this cake too. I baked a half sheet and then carved it in the shape of his head. The side pieces were glued onto the sides with butter cream icing. I think this was the first time I tinted the fondant. It takes a lot of kneading to get it good and mixed to that you have uniform color. If you have ever worked with clay, fondant is pretty much the same thing. You have the knead it to get the bubbles out. If you fold it over, you will create more bubbles. If there are any bubbles in it when you roll it out, they'll pop out and make the icing all lumpy.

After covering the cake with the yellow fondant, I painted on the rest of the details with black and red cake dye.

Transformers, Take 1


My son got one of his friends hooked on Transformers toys. I can't blame him, I loved the things when I was growing up too. Who am I kidding, I still like them. As far as toys go, they're freakin' brilliant. I offered to do the cake for my son's friend's birthday. Other than telling me he wanted a Transformers cake, it was up to me. This thing was huge. I was told there would be quite a few people at the party, so I was worried that a half sheet would not be large enough. I ended up putting two half sheets side by side. One white and one chocolate. It was so large an heavy that I ended up putting it on a piece of wrapped plywood to transport it. When I do a cake like this, I like to experiment since I was doing it as a favor for someone. I figure that as long as I don't make something hideous, they'll be happy. Not that I would present them with something that I thought was sub-par, but I still like to experiment. It's the only way I've learned this stuff.

I found a recipe for marshmallow fondant. It's easy to make and tastes a heck of a lot better than the classic stuff. Since I had to cover the cake with one sheet of fondant, I think I made a double batch. One batch will cover a half sheet pretty easily, so I simply doubled it. Considering how big this thing was, I couldn't roll it out on my silicone pastry mat. I ended up using half of the kitchen table instead. I simply greased up the table and got to rolling.

Once rolled out, transferring a sheet this large isn't easy either. I covered the cake with buttercream icing, which you have to do if you want the fondant to stick to it, and then slit two long dowels under the cake parallel to each other. Lifting the dowels, I was able to drape the fondant over the cake. After that, all you have to do is smooth it out.

I hand painted the image on the fondant. This is done by mixing the cake dye with everclear to thin it out. The result is a liquid that you can paint with. If you use water to thin the dye, it will eat the icing and get sticky. Everclear evaporates quickly and doesn't make the fondant sticky. The image took me quite a while. You can also see a little bleed-through in the middle where I may have gotten to close to the other color and they bled over on one another.
Some people really don't like fondant. I'm not a huge fan of the texture, but I don't mind a little bit of it. People at the party were really impressed with the cake, though not everyone liked the fondant. It does take some getting used to. That's why I usually put plenty of buttercream under the fondant. If you don't like the fondant, you can simply peel it off and enjoy the cake as you normally would. I really have to wonder about these cakes I see the professionals on TV make. They almost always use fondant on their cakes, mostly because you can get the coolest effects with fondant. You sacrifice flavor and texture when you do that though. It all depends on what you want the cake for.

Cars

At the time, my son was just crazy about the movie figures in Cars. He watched a little of the movie, but he didn't really care about the film itself. The absolutely loved the Cars toys that we bought him though. In light of that, I decided to make this cake. We bought the cars on top new so that they would be clean and would be part of his gift. He would be able to play with them as soon as we cut the cake. I tried to figure out just what I wanted to do for a while before settling on this design. I had grander plans of doing a stadium with a track, but couldn't quite figure out how I would go about building exactly what I wanted. I also wanted to try using fondant for this cake so that I could get the flat track surface. I found a recipe for classic fondant and used it. I could have bought the fondant at the craft store, but making it was cheaper and probably tasted a little better than that boxed stuff.
I learned a few things from this experience. First, I hate the taste of classic fondant. It's almost waxy and isn't very good. Since then, I have found a better alternative. It's also a pain to mix and use. I finally got it rolled out and cut into the track shape. I "painted" the track with black cake dye. Using powdered dye, it gave the track a matte effect which looked more like a roadway. The rest of the cake was the standard butter cream icing. The "Laps Complete: 4" on the side was an addition that I made at the last minute. I thought it would be a cute way to indicate his age.

Thursday, July 1, 2010

Cinderella's Castle

I made this one for a neighbor of ours who had a little girl. I offered to do her birthday cake for them and asked what she would like. They came up with the Cinderella idea, and I said that I would do a castle and gave them the task of finding a small Cinderella figure that could be put next to or on the castle. They did find a small figure that I never did get a picture of. I'm sure you know what she looks like. I used a square springform pan that I had to do this one. I baked three layers. There were both chocolate and white layers. The turrets are cake cones on bottom covered with icing with inverted sugar cones on top to provide the points. The draw bridge is a graham cracker. Thank goodness I only had to carry it next door, because I'm not sure the turrets would have survived a car ride without falling off. I only secured them with toothpicks and it was before the time that I started experimenting with cake density where it would have supported such a thing. It worked out and the family was thrilled.

Greetings Grasshopper


My son wanted a grasshopper cake for his birthday. I wouldn't have been real impressed with just doing a sheet cake and drawing a grasshopper on it. Plus, I wanted to try my hand at doing a 3-D cake. I cooked a half sheet cake and then cut it in three long pieces. I then stacked the pieces to make a tall long box that I then carved into the grasshopper shape. I iced the grasshopper body, then added the legs, which are just breadstick size pretzels. The antennae are the small stick pretzels.

Monster Cupcakes


I'm not talking about big cupcakes here, but true monsters. Pictured are Frankenstein's monster and a wolfman. I also attempted a vampire, but wasn't real impressed with the results. I'll have to work on that one if I decide to do these again. The pack of ice cream cones I used for these come in green, brown, and pink. I filled them with bake batter and baked the cupcakes inside of them. These are pretty good if you've never had them before. After baking, I added the hair to the tops and then decorated the faces. For Frankenstein's monster (and no, the monster is not called Frankenstein) I used green Jujubes for the neck bolts. I love Jujubes, so it gave me an excuse to buy a box and eat whatever was left over. I bought a big box just so I was sure to have plenty of green ones. I made enough of these for my son's entire class in Kindergarten. The teacher loved them so much that she insisted that my son take one to the principal, who loved it. Transporting these is a challenge though. What I ended up doing was taking a baking dish with high sides and putting a dab of icing on the bottom and sticking the cones to it. Once dry, they were stable enough to transport without too many casualties.

Pirates!


This one was pretty easy, but turned out cute. We wanted to get our son some pirate figures that he could play with. These are Playmobil toys that I put on a small sheet cake with a couple of rounds that were notched on one side to fit together into something resembling an island. Sand colored icing can be tricky. I should have had a lighter color, but this worked. I kept the icing a little dry for the sand so it would look rough. I used the technique that I used on the Nemo cake where I sprayed water on the blue and then smoothed it out to get some discolorations and depth in the blue icing. The toys were put on top after the cake was completely iced. Writing his name in the sand was a last minute addition that I thought would be cute.


Thomas

From what I recall, I did not use a shaped cake pan for this one. I shaped it simply by carving a rectangular quarter sheet cake. Looking a a front-on picture of Thomas (which is pretty hard to find) I freehanded all of the decorations on this one. The icing was really thick, which is why the lines aren't completely straight. I was decorating this one at the last minute, so taking the time to thin out the icing again after I already started decorating wasn't really an option. I was sufficiently proud of this one for as little experience as I had at the time.

Christmas Tree Cake

This Christmas Tree cake was made using a shaped pan. I have quite a few shaped pans that I almost never use. I try to avoid the character pans because I'll really never use those, but I think I have a few anyway. I covered this cake using an icing tip that is used to make a hair effect. I figured it would make it look more like pine needles. I think I used M&Ms and sour Skittles for the ornaments. The sour Skittles have an opaque sugar coating that added a little more interest since all of the ornaments wouldn't simply be primary color shiny. Unfortunately, I used canned icing for the garland. Canned icing really isn't of much use for anything except covering a cake. It's way too soft for any real decorating. It turned out well enough, but I wish that I would have simply mixed another batch of white icing instead of using that canned stuff. Additionally, I wish I had pulled out some sort of toy to put on the top. Again, the bow I tried to put on there would have worked using my own icing, but not with the canned. Live and learn.