Friday, July 2, 2010

Cars

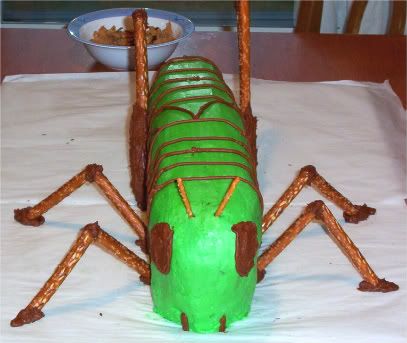
At the time, my son was just crazy about the movie figures in Cars. He watched a little of the movie, but he didn't really care about the film itself. The absolutely loved the Cars toys that we bought him though. In light of that, I decided to make this cake. We bought the cars on top new so that they would be clean and would be part of his gift. He would be able to play with them as soon as we cut the cake. I tried to figure out just what I wanted to do for a while before settling on this design. I had grander plans of doing a stadium with a track, but couldn't quite figure out how I would go about building exactly what I wanted. I also wanted to try using fondant for this cake so that I could get the flat track surface. I found a recipe for classic fondant and used it. I could have bought the fondant at the craft store, but making it was cheaper and probably tasted a little better than that boxed stuff.
I learned a few things from this experience. First, I hate the taste of classic fondant. It's almost waxy and isn't very good. Since then, I have found a better alternative. It's also a pain to mix and use. I finally got it rolled out and cut into the track shape. I "painted" the track with black cake dye. Using powdered dye, it gave the track a matte effect which looked more like a roadway. The rest of the cake was the standard butter cream icing. The "Laps Complete: 4" on the side was an addition that I made at the last minute. I thought it would be a cute way to indicate his age.

Thursday, July 1, 2010

Cinderella's Castle

I made this one for a neighbor of ours who had a little girl. I offered to do her birthday cake for them and asked what she would like. They came up with the Cinderella idea, and I said that I would do a castle and gave them the task of finding a small Cinderella figure that could be put next to or on the castle. They did find a small figure that I never did get a picture of. I'm sure you know what she looks like. I used a square springform pan that I had to do this one. I baked three layers. There were both chocolate and white layers. The turrets are cake cones on bottom covered with icing with inverted sugar cones on top to provide the points. The draw bridge is a graham cracker. Thank goodness I only had to carry it next door, because I'm not sure the turrets would have survived a car ride without falling off. I only secured them with toothpicks and it was before the time that I started experimenting with cake density where it would have supported such a thing. It worked out and the family was thrilled.

Greetings Grasshopper


My son wanted a grasshopper cake for his birthday. I wouldn't have been real impressed with just doing a sheet cake and drawing a grasshopper on it. Plus, I wanted to try my hand at doing a 3-D cake. I cooked a half sheet cake and then cut it in three long pieces. I then stacked the pieces to make a tall long box that I then carved into the grasshopper shape. I iced the grasshopper body, then added the legs, which are just breadstick size pretzels. The antennae are the small stick pretzels.

Monster Cupcakes


I'm not talking about big cupcakes here, but true monsters. Pictured are Frankenstein's monster and a wolfman. I also attempted a vampire, but wasn't real impressed with the results. I'll have to work on that one if I decide to do these again. The pack of ice cream cones I used for these come in green, brown, and pink. I filled them with bake batter and baked the cupcakes inside of them. These are pretty good if you've never had them before. After baking, I added the hair to the tops and then decorated the faces. For Frankenstein's monster (and no, the monster is not called Frankenstein) I used green Jujubes for the neck bolts. I love Jujubes, so it gave me an excuse to buy a box and eat whatever was left over. I bought a big box just so I was sure to have plenty of green ones. I made enough of these for my son's entire class in Kindergarten. The teacher loved them so much that she insisted that my son take one to the principal, who loved it. Transporting these is a challenge though. What I ended up doing was taking a baking dish with high sides and putting a dab of icing on the bottom and sticking the cones to it. Once dry, they were stable enough to transport without too many casualties.

Pirates!


This one was pretty easy, but turned out cute. We wanted to get our son some pirate figures that he could play with. These are Playmobil toys that I put on a small sheet cake with a couple of rounds that were notched on one side to fit together into something resembling an island. Sand colored icing can be tricky. I should have had a lighter color, but this worked. I kept the icing a little dry for the sand so it would look rough. I used the technique that I used on the Nemo cake where I sprayed water on the blue and then smoothed it out to get some discolorations and depth in the blue icing. The toys were put on top after the cake was completely iced. Writing his name in the sand was a last minute addition that I thought would be cute.


Thomas

From what I recall, I did not use a shaped cake pan for this one. I shaped it simply by carving a rectangular quarter sheet cake. Looking a a front-on picture of Thomas (which is pretty hard to find) I freehanded all of the decorations on this one. The icing was really thick, which is why the lines aren't completely straight. I was decorating this one at the last minute, so taking the time to thin out the icing again after I already started decorating wasn't really an option. I was sufficiently proud of this one for as little experience as I had at the time.

Christmas Tree Cake

This Christmas Tree cake was made using a shaped pan. I have quite a few shaped pans that I almost never use. I try to avoid the character pans because I'll really never use those, but I think I have a few anyway. I covered this cake using an icing tip that is used to make a hair effect. I figured it would make it look more like pine needles. I think I used M&Ms and sour Skittles for the ornaments. The sour Skittles have an opaque sugar coating that added a little more interest since all of the ornaments wouldn't simply be primary color shiny. Unfortunately, I used canned icing for the garland. Canned icing really isn't of much use for anything except covering a cake. It's way too soft for any real decorating. It turned out well enough, but I wish that I would have simply mixed another batch of white icing instead of using that canned stuff. Additionally, I wish I had pulled out some sort of toy to put on the top. Again, the bow I tried to put on there would have worked using my own icing, but not with the canned. Live and learn.